Make-up air: The volume of air that is required to replace exhausted air from a given space.
If you have gas appliances, a well weatherized and insulated home, and exhaust fans check out the following video for a serious consideration….
Make-up air: The volume of air that is required to replace exhausted air from a given space.
If you have gas appliances, a well weatherized and insulated home, and exhaust fans check out the following video for a serious consideration….
It is very common for me to inspect homes that are older than the 1960s that have three-prong outlets that are not grounded.
Originally these outlets would have been two-prong, with one side acting as the “hot” and the other side acting as the “neutral.” The hot is, for the purposes of my discussion, the supply of power and the neutral is the return. When well-meaning homeowners try to “improve” their original two-prong outlets with three-prong outlets they very rarely think about the third prong and what its purpose might be and the fact that there is no wire for the third hole in the outlet.
When I often describe what is going on, my client’s thoughts jump to their electrical devices not functioning properly. The proper function of electrical devices is not really what we are dealing with when a ground wire is missing. The ground wire is merely a backup for the neutral/return, and its purpose is to protect the occupant (you) from shock/electrocution and has very little to do with proper function.
There is a slight caveat when referring to grounds, computers and some newer televisions. Surge protectors take excess electricity and dump it into the ground leg. If no ground is present the surge protector will not function. I have also heard that some newer televisions will not function at all without a ground. This is a liability protection for the TV manufacturer that is built into some newer TVs.
To put this in a more understandable analogy I compare this situation to a car. Ground wires are kind of like seat belts. They protect the person from injury and older homes (just like vehicles and seat belts) didn’t have them. Grounds/seatbelts really don’t affect the way the car drives/electrical device operates. They are merely safety devices that will protect you from injury. Grounds are not required in the 1950s or older homes, just like seat belts aren’t required in that age car. Vintage two-prong plugs are relatively safe because it is obvious that there is not a ground, and you cannot plug in a device that wants the ground prong.

Three-prong adaptors are devices that allow you to plug a three-prong plug into a two-prong outlet. When three-prong adaptors are used it is VERY important that the electrical box is grounded. You might be wondering what in the world is a grounded box? In the early to mid 60’s the nonmetallic wiring changed from a strictly two-wire (one hot, one neutral) to a three-wire (one hot, one neutral, and a newly added ground). The wiring changed but many of the plugs (two prong) did not change. The only way to verify if the box is grounded is with a tester. Plug one side into the hot and touch the other to the screw in the center of the outlet. If the outlet is grounded there will be a completed circuit and the light will glow. This type of grounded box is the ONLY time that the three-prong adaptors should be used on a two-prong plug!
Now let’s say the home we have an interest in was pre 60’s and none of the outlets are grounded, what do you do now? Always, always, always talk to a licensed professional electrician. The conditions I describe are totally generalities and your specific situation may have special circumstances that make these general recommendations less than ideal or even DANGEROUS! Now with that disclaimer out of the way……..
Grounds are especially important around water sources. Kitchens, bathrooms, garages, and exterior plugs should all be grounded at the very least. These areas are the places where you are most likely to become a great source for electricity to try to jump to ground through you.
I have used this analogy for a few years, and it seems to hold up pretty well when describing this electrical theory. If you have any questions on how the electricity works in your home, please contact your local electrician or of course your favorite home inspector!
Jim Allhiser President
503-508-4321
Web: www.SalemOregonHomeInspections.com
Email: Jallhiser@PerfectionInspectionInc.com
Facebook: http://www.facebook.com/PerfectionInspectionInc
Blog: https://salemoregonhomeinspector.com/
OCHI# 916 CCB# 179533
Oil tanks were very common between the 1920s and 1960s for the relatively cheap heating oil for the oil furnace and for a while it was thought that sticking those tanks in the ground would be a great idea. If the home has exchanged hands a few times a hidden underground tank may be easily forgotten. The presence of a hidden underground oil tank is an issue that can rear its ugly head during a real estate transaction/home inspection every now and then. There are some things that you should know to help protect your client and yourself. A licensed professional tank locating service is the best way to ensure that no problem tanks exist under the surface however there are a few things that buyers, agents and home inspectors can look for that can be flags that indicate the need for further evaluation. Fill, or Vent Pipes or the tank itself:  The tank is pretty self explanatory but the fill and vent pipes are usually a little more concealed and you must know what to look for. The fill lines will usually be a 2 or 3 inch pipe sticking up from the soil or out the side of the home. The vent lines will be smaller 1 inch pipes with special vent caps like these photos.
 These tubes are not terribly reliable because they are easy to cut off and cover up. Supply lines: Short of a metal detector and probes (professional tank finder tools) the supply lines are the best indicators of underground tanks. Supply pipes will be small(1/4″) copper lines. These lines, or the remnants of the lines will be located in the basement/garage, near the furnace (or where the furnace once was located) or in the crawlspace. In general, two lines indicate underground tanks. One is for the supply and the other is for the unburnt oil to return to the tank that is lower than the furnace. If only one line is present it may be an indication for an above ground tank. Unfortunately these are general rules and underground tanks could have still used one line.
  The two lines to the left could be noted in the crawlspace. The crawlspace is the place where things are least likely to be “covered up.”
  The clipped lines to the left were noted in a home that had an oil tank that had been properly remediated. Unfortunately these lines were going to a completely different tank in on the opposite side of the home! If any of the above conditions can be noted it is time to do some more investigation. The internet and the DEQ is the first place to check.
If documentation of the tank cannot be located online the next step is to call the DEQ. The database is for only tanks that have leaked and if the tank was above ground or removed with no evidence of leakage it will not be in that database. The DEQ has records of tanks that have been decommissioned and not leaked in a PDF document here: http://www.oregon.gov/deq/FilterDocs/HOTCleanDec.xlsx.
If all of that fails, you can contact DEQ directly. I have made a contact with: DEQ HOT (Heating Oil Tank program)
503-229-6170 and found them to be very helpful!
If the above steps are taken and proper documentation still cannot be located, it is time to call a professional oil tank location/removal/remediation company. I recommend two in the Salem area:
(503) 304-9653 Karl VanZandt
(503) 236-3796 office http://www.xavierenvironmental.com/
These are the proper steps to take if an underground tank is suspected. The responsibility of proper remediation fall on the current owner and the cleanup of leaking underground tanks can easily exceed $10,000. Pay attention and don’t be surprised with that expense. I welcome calls or emails if additional information is desired.
Jim Allhiser President
503-508-4321
Web: www.SalemOregonHomeInspections.com
Email: Jallhiser@PerfectionInspectionInc.com
Facebook: http://www.facebook.com/PerfectionInspectionInc
Blog: https://salemoregonhomeinspector.com/ OCHI# 916 CCB# 179533
A few years ago the Construction Contractor’s Board did some revising to one section of their “Standards of Practice for Home Inspections.” The section referred to gifts or rewards for the purposes of referrals. It was always a little ambiguous and in order to clear up some confusion they posted 4 pages worth of, “what the rule really means.”
If you would like to read the post in its entirety it is here: http://ccbed.ccb.state.or.us/WebPDF/CCB/Publications/HI_FAQs.pdf
Here are the highlights as I see it:
2. May a home inspector advertise on a website
containing listings for homes for sale? In general, the
answer is yes. However, if the website is maintained by a
real estate agent and the home inspector buys the
advertisement to induce the real estate agent to refer
business to the home inspector, the practice is prohibited.
3. May a home inspector advertise on a real estate agent’s
website if the home inspector did not pay for the
advertisement? Yes, so long as the home inspector did not
pay the real estate agent nor give the real estate agent
anything of value.
10. May a home inspector share the cost of joint
advertising with a real estate agent? No. The real estate
agent would receive the benefit of the reduced cost of
advertising. Joint advertising likely implies a recommendation
of the home inspector by the real estate agent.
11. May a home inspector hand out to the general public
pens, notepads, magnets, coffee mugs, calendars,
candies or similar items with the home inspector’s
name? Yes. The rules do not prohibit home inspectors from
providing items of nominal or actual value to the general
public or to potential or actual customers.
12. May a home inspector deliver to a realty agent pens,
notepads, magnets, coffee mugs, calendars, candies or
similar items with the home inspector’s name? No.
Since the items are likely to be used or consumed by the
realty agent, the implicit purpose is to encourage a referral.
The conduct is prohibited. It does not matter that the items
may have only a nominal or small value. The rule does not
distinguish on the basis of the value of the items.
20. May a home inspector with a booth at a realty agent
trade show offer a (relatively modest) door prize torealty agents?
No. Since the door prize is intended for
realty agents, to obtain business referrals, the conduct is
prohibited.
21. May a home inspector with a booth at a realty agent
trade show offer chocolate candies to the realty
agents? No. Since the chocolate candies are intended for
realty agents, to obtain business referrals, the conduct is
prohibited. The new rule does not distinguish on the basis of
the value of the item provided.
22. May a home inspection company that operates on a
national or regional basis hold a contest or drawing,
open both to the general public and to realty agents,
and give out randomly won prizes? Yes. Presumably,
there is no distinction between entrants, be they realty agents
or other members of the general public. (There may be other
government regulations that restrict contests or drawings.
Our answer does not address those laws.)
These rules and definitions come from a good place. There is no good that comes from buying referrals. Inspectors that do not precisly understand that they are contracted to protect the client’s interest may have feelings that they are there to help the referring agent. This only creates bad feelings and distrust throughout the entire realestate process.
My main referral source is the great agents that recommend me to their clients. The only reason these wonderful agents recommend me is because I protect their clients and, indirectly, their good name and real estate license. These agents realize that even though deals may fall apart by the time I am done it is because of the home’s condition and the inability of the buyer and seller to come together. For better or for worse their clients should know as much as possible about their home before the deal closes.
If you have read my earlier post on crawlspace and basment leakage and waterproofing, and you have taken steps to remove the downspouts discharge from near the home but you still are having moisture manifest in unwanted areas under or in your home what are the some of the next steps that you should consider?


It is pretty rare to find a home around the Salem Oregon area that is built with the basement in the last 20 years. The reason for this is basements are low, cut into the ground, and in this part of the country the water tables rise in the wintertime and it takes extra work to keep these basements dry. There are a few newer homes being built with basements and the techniques and materials they use for waterproofing these basements have come a long ways. For the most part, the added expense of waterproofing has been traded for more straightforward and larger margins for error with the crawlspace design. If water enters a crawlspace it is not imidiately damaging however it is not good to have a seasonal lake in your crawlspace either!
So let’s assume you own a home or are interested in buying a home that has a basement or crawlspace. Let’s look at some areas to keep your eye on and ideas for fixing the issue of water in basements and crawlspaces.

The picture above shows typical areas that home inspectors look for when inspecting basements. Water stains cannot tell you how often the leakage occurs but it does indicate an issue and something that may need further investigation and repair.
In Salem, Oreogn, most of the water penetration issues in basements or crawlspaces will be related to ground water. The term “ground water,” refers to the water table. The water table is the point in the ground where saturation reaches full capacity. Picture the water table like a sponge that is stood up on end, and water is added. The water will flow through the sponge and pool up at the bottom until gravity overcomes surface tension. The line of saturation at the bottom is kind of like the water table. As we recieve rain the ground soaks it up. The amount of rain we get determines how high the table will rise. The water table is continually rising and falling based on the percipitation.
Now dig a hole in that sponge and place footings and foundation walls for a basement or crawlspace. Quickly you realize that basements and crawlspaces are the first places to get wet.

What now? Now that we know where that water is comming from we can look for solutions.
Sump Pumps-
By the time the buyer’s home inspection is conducted time tables are short and repairs are needed quickly. This can be troubling because to properly fix a basement/crawlspace water issue you should take some time to properly diagnose the issue. Sump pumps have become the do-it-all band-aid and often the water issue should have been corrected in a another area. Sump pumps should be a last resort, and unfortunantly in the real estate world they are usually the first idea, due to the time constraints.

In general the water in the crawlspace or basement needs to be rerouted at the source. Determining where the water is coming from takes time. I met a wonderful Salem agent years ago when she was envolved with a buyer and a wet crawlspace. I was hired by the seller to help determine why there was water in the crawlspace. The buyer’s inspector stated that there was water in the crawlspace and repairs were needed. The sellers hired a waterproofing contractor and the contractor told them they needed a sump pump and trenching (surprise, surprise! contractor’s feed their familys by installing sump pumps and trenching!). I came in and started looking at where and why the water was entering the crawlspace and, over the course of two weeks of rainy weather and diagnostics, the seller ended up disconnecting the downspout near the front entry slab, routing it away from the home and *poof* the crawlspace dried up! Without digging up the entire perimeter of the home it was speculated that the underground downspout piping was crushed/disconnected/plugged near the front entry slab and dumping all of the water collected by the roof and gutters right against the foundation and crawlspace!
Would a sump pump have dried up the crawlspace too? Yes, however sump pumps are perennial maintenance items and must be checked on to verify that they are working properly. I don’t know about you, but I prefer to not enter my crawlspace if I don’t have to. Why use a pump that needs constant attention in a place that I don’t want to go?
That situation was unusual because we actually had time to find and properly diagnos the problem. Unless you get a “pre-sale” or “seller’s” inspection, you usually do not have that kind of time to ferret out the real cause of the water.
That situation was not unusual in the fact of water in basements and crawlspaces ususally manifests from gutters and downspouts. These are the first places to investigate and repair if water issues are noted. If your home was built in the last 20 years your downspouts will pour into underground piping. It is critically important that these pipes are functional and if these pipes are plugged or crushed it is time to do some shovel work. If you do have to re-route your downspouts a good rule of thumb is that the downspouts need to dump at least 10 feet away from your home! Those silly little splash blocks, although they may make an FHA appraiser happy, are not a good solution for keeping your basement or crawlspace dry.

What if you have a basement, you have made sure all of the storm water dumps 10 feet away and downhill of your home and you STILL have moisture issues periodically in your home, whats next?
 The next post I will delve into some other options for “de-watering” or drying out your home.


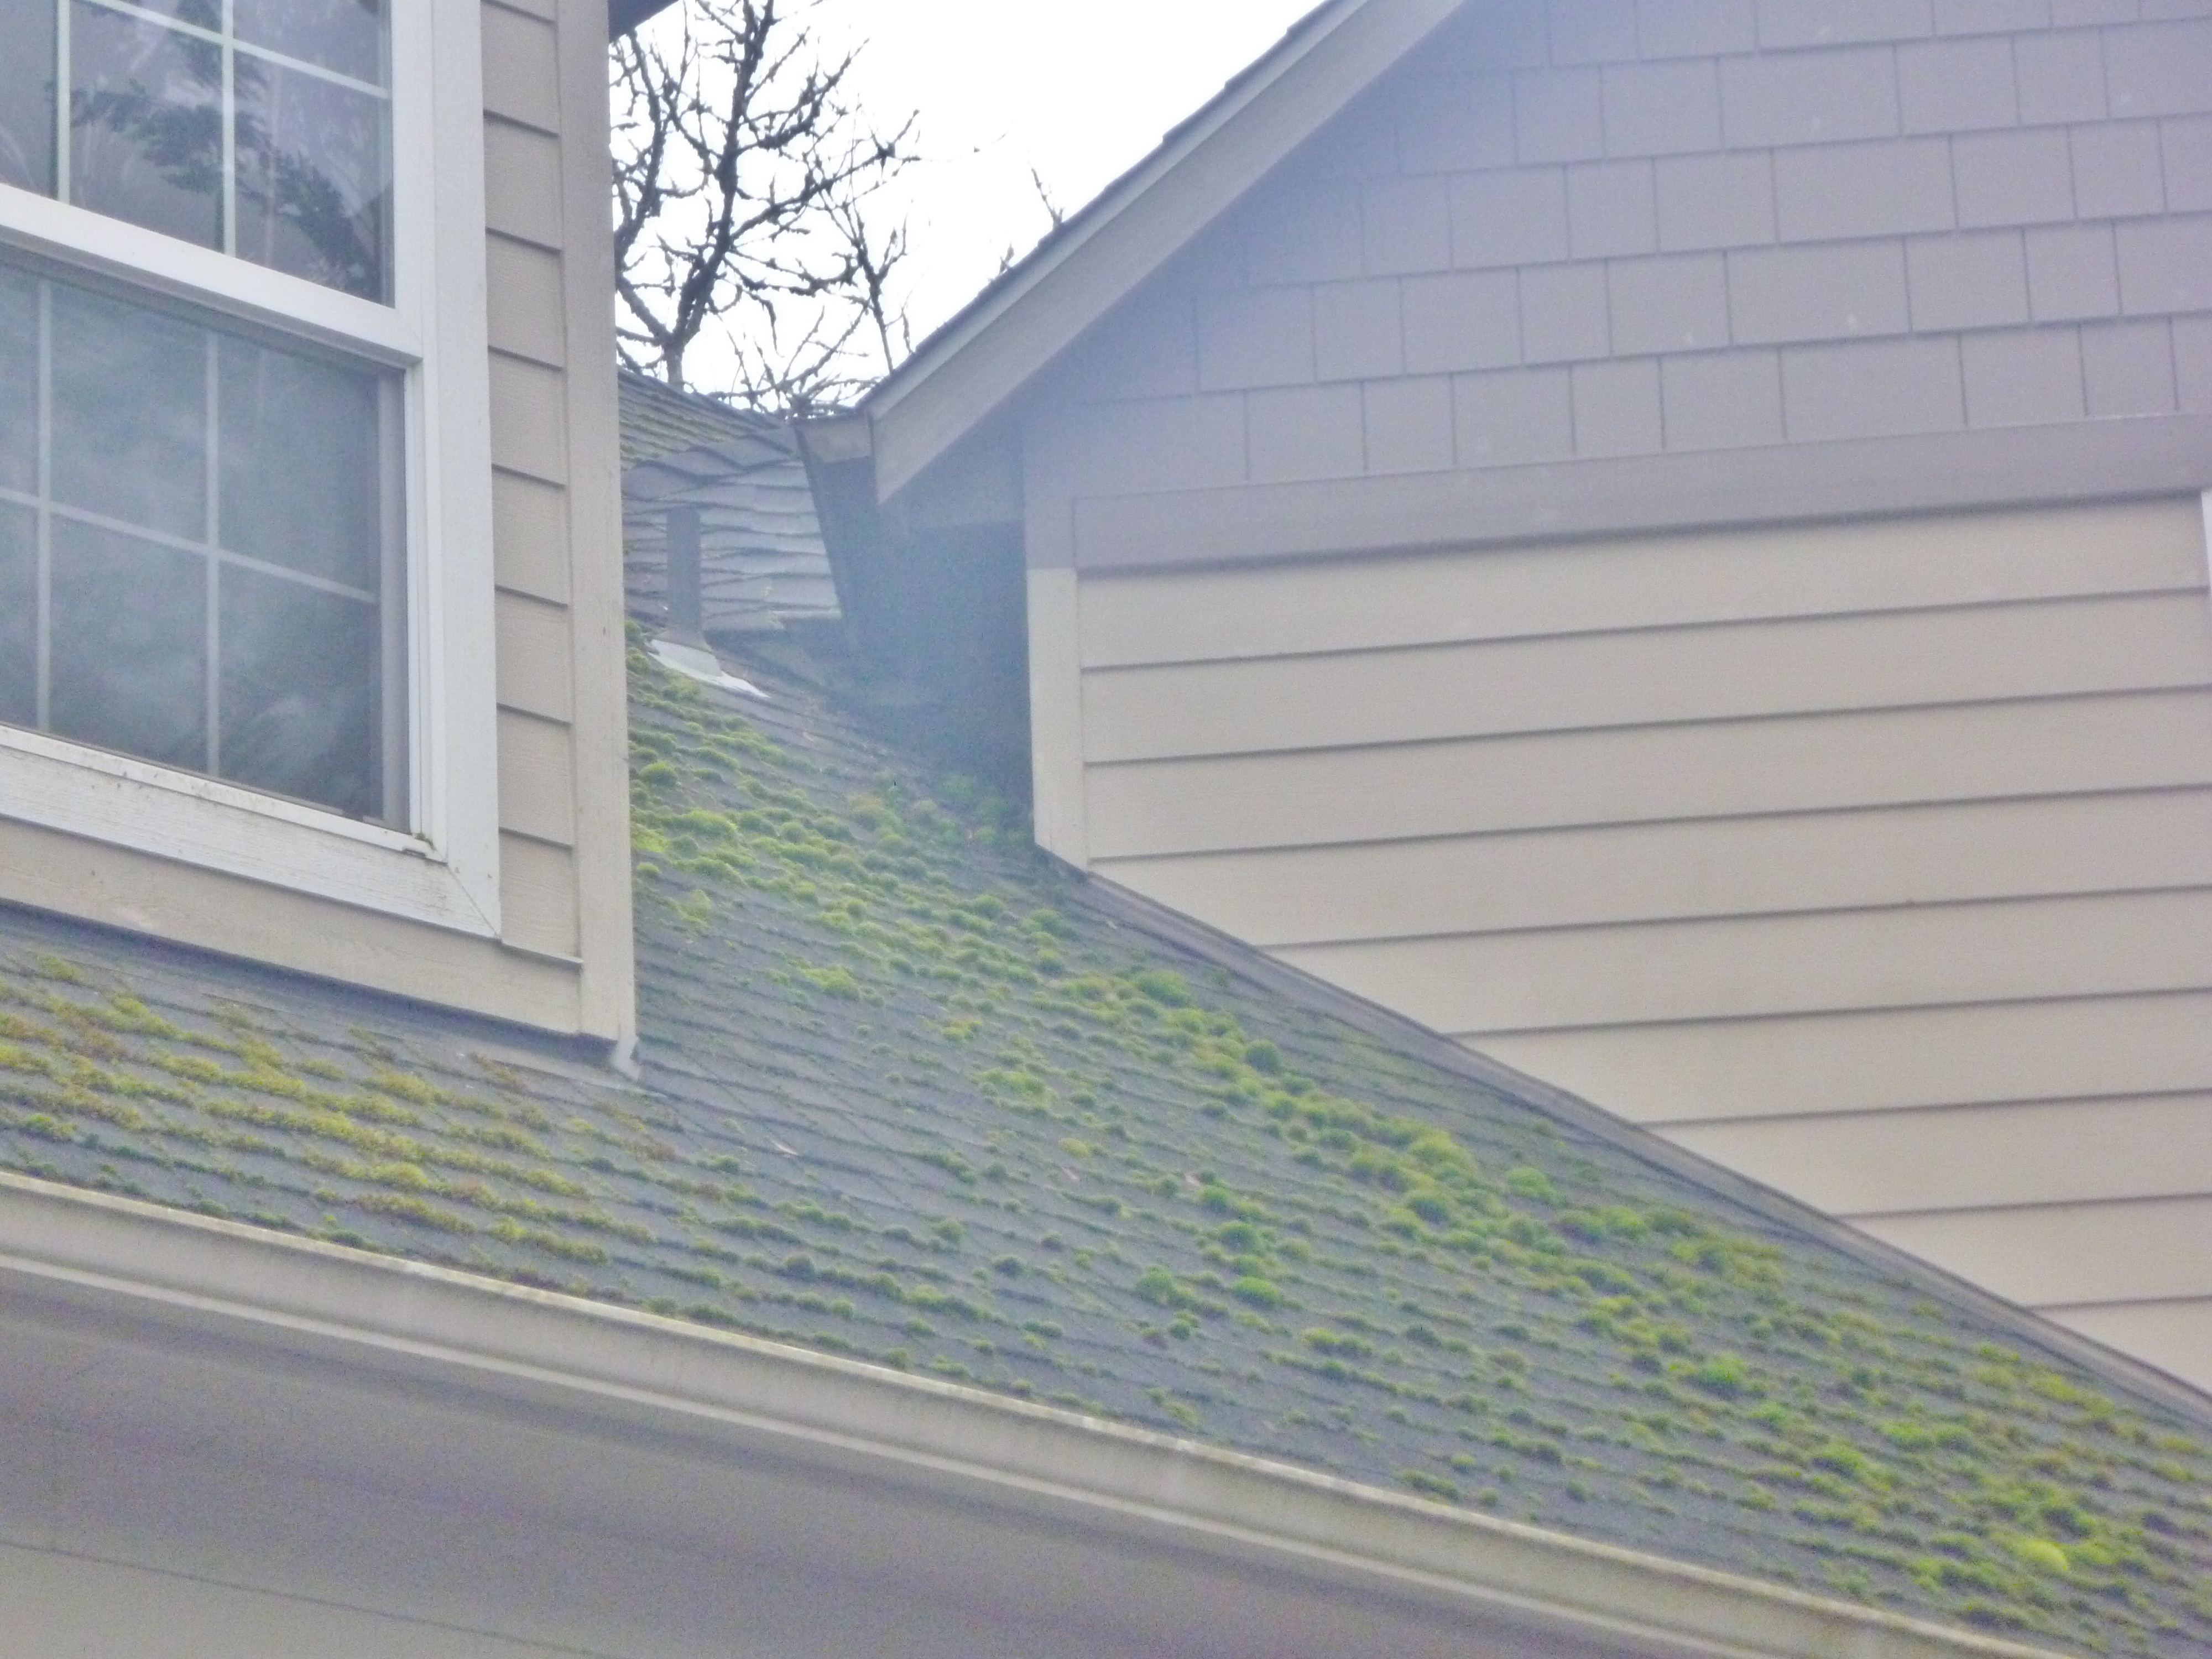
Moss is very common in this area. Moss and algae grow mostly in areas of low light and high moisture. Low light and high moisture pretty well describes most of the western northwest and the wintertime. Some of the most common ways to treat and maintain your roof are listed below.
One of the areas that moss is a concern on homes in this area our roofs. Depending on the roof’s exposure moss can grow most of the year. If sections of your home’s roof are shaded throughout the day and stay moist these are likely areas to grow moss.
Over time moss can damage your shingles if left un-checked. As the moss develops into a larger and larger colony more and more moisture is held against your roof. The colonies will also develop root-like systems that will dig into the surface fibers on your shingles. As the colonies grow larger, they can actually lift the edges of the shingles and delaminate the surface granules.
There are lots of ways to kill moss. Most of the good techniques involve some sort of the heavy metal application usually copper or zinc. Some really bad ideas involve laundry detergent and or power washers…
In general, the more trees you have around your house and/or the steeper your roof the more applications of moss killer you’ll need.
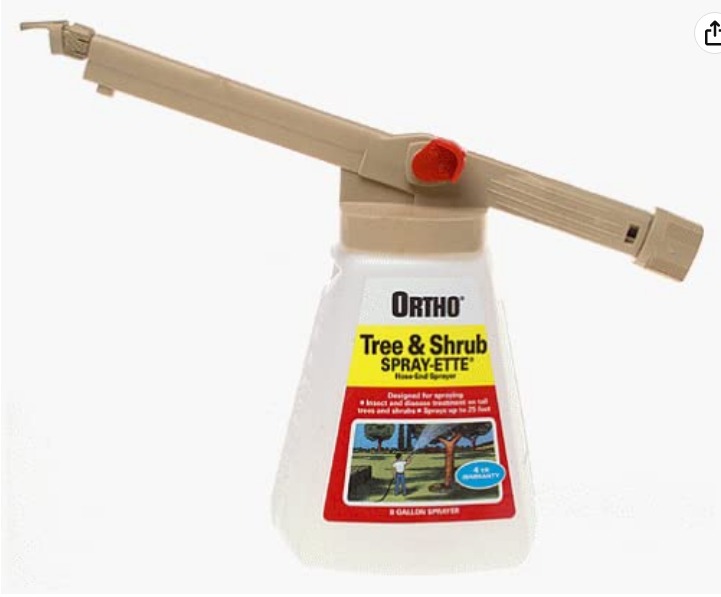
1. The best way to control moss is with an annual or biannual application of a powdered or liquid name brand moss killer designed for roofs. For steep roofs I have found the liquid anti-moss chemicals and a hose end attached shrub and tree sprayer to be a handy tool.

2. Another option for continuous moss control are some new shingles that are actually impregnated with copper granules. I have only seen the shingles used on several roofs and the major issue with these is the fact that the ridge shingles did not appear to be impregnated and still need to be treated for moss/algae growth.

3. Mechanically removing the moss is also an option. This option is really only for the very worst conditions. It involves a paint scraper, screwdriver, putty knife or something similar and trekking across your roof slope and very carefully removing the moss growth. This technique is very prone to damage of the asphalt composition shingles and should be used as a last resort.
4. Zinc or Copper Strips- These may be ok for preventing algae growth but moss looks at the little strips and laughs. You may have noticed some homes around town that have clear/clean sections of shingles under the metal roof vents. What is going on here is the zinc from the galvanized steel roof vents is leaching onto the roof surface and running down every time it rains. This has lead people to believe that sections of copper wire or small strips of zinc could be an effective way to kill moss. In the wet PNW this is not an effective technique. The difference is all about surface-area. The galvanized roof vents have a good amount of metal exposed and therefore a pretty good amount of zinc washes down the roof surface. Compare that surface to the 2″ wide strip of zinc and you can see there will be far less leaching occurring off the little zinc strips. The strips usually are effective for 2 to 3 feet down the slope. I have seen the strips added every 2 feet down an entire roof slope. This installation appeared to be effective, but it was weird looking and I have only seen that once on the top of a three-story apartment building.
5. Power washing, scraping with brooms, or laundry detergent. Unfortunately, I see the aftermath of these steps to control roof moss on far too many Salem area home inspections. If you are reading this post you probably have educated yourself enough to know that blasting or scraping the surface off of your asphalt composite roof is a bad idea.
-There may be some contractors who use power washers to clean roofs, but these individuals are licensed, bonded (and most importantly insured) and have the experience to know which nozzle to use and how far to hold it away from the roof surface. Even with this experience and expertise roof life is blasted away. It is probably the last 5-10 year of roof life, so you may not see issues for a while. Power washing should be strictly limited to the driveway and walkways surfaces around your home.
-Brooms and other mechanical abrasives are also techniques that should either be left on the ground or for qualified professional contractors. The removal of the surface granules on the asphalt shingle removes the ultraviolet resistance of the shingles and will cause premature failure of the system.
-Laundry detergent, although will kill moss on your roof, is full of degreasers. An asphalt based composite shingle is a petroleum-based grease compound. Do not put degreasers on your greasy roof! (Thanks Joe Ocilia for educating me on this fact!)
People are not perfect. Despite the name of my business, my inspections are not perfect, but I strive every day to make them as close as I can. People build homes and no matter what there is always something that could be adjusted, maintained, or updated to help the home be more “perfect.”
These improvements can sometimes be debatable but some things, like the proper ducting and expulsion of bathroom exhaust, are not negotiable.
The little exhaust fans in our bath and laundry rooms’ ceilings are often forgotten about. These little fans can collect and concentrate significant amounts of moisture. If the vapor that they collect is not expelled out of the home it can cause moisture-related issues like deterioration, fungus, termites, beetles, etc…
Traditionally the fans are ducted with a flexible metal duct up to a roof vent. Where the air that is leaving the attic carries the moist bathroom air up and out of the attic. It is currently acceptable to vent the ducts to the soffit, but I am definitely not a fan of this idea because the soffit vents are intakes and all of the warm moisture-laden bathroom air that is blown out of these vents is usually sucked back into the cool attic.

I popped my head up into a new home’s attic the other day during a home inspection and noticed something was missing. The bathroom fans all worked fine, the ducting was routed properly up to the upper roof vents, there was just one key component that was not installed properly….
The hole for the roof vent, although cut through the OSB sheathing, had not been cut through the roofing shingles and building paper.
The home was so new there had not been any substantial moisture added to the attic and repairs simply involved cutting a hole.


The other day I helped a client with an unfortunate situation: her home’s roof was leaking.
The worst part of this issue was the fact that she had paid roofers to find and repair this leak multiple times.
This last summer she even had the drywall repaired under the leak figuring that the roofers had actually done what they had been paid to
do.
By the time she got a hold of me, she had reached the end of her
rope and was on the edge of tears. I told her that I would be happy to
come to do an inspection to locate the leak and hopefully give her some unbiased answers.
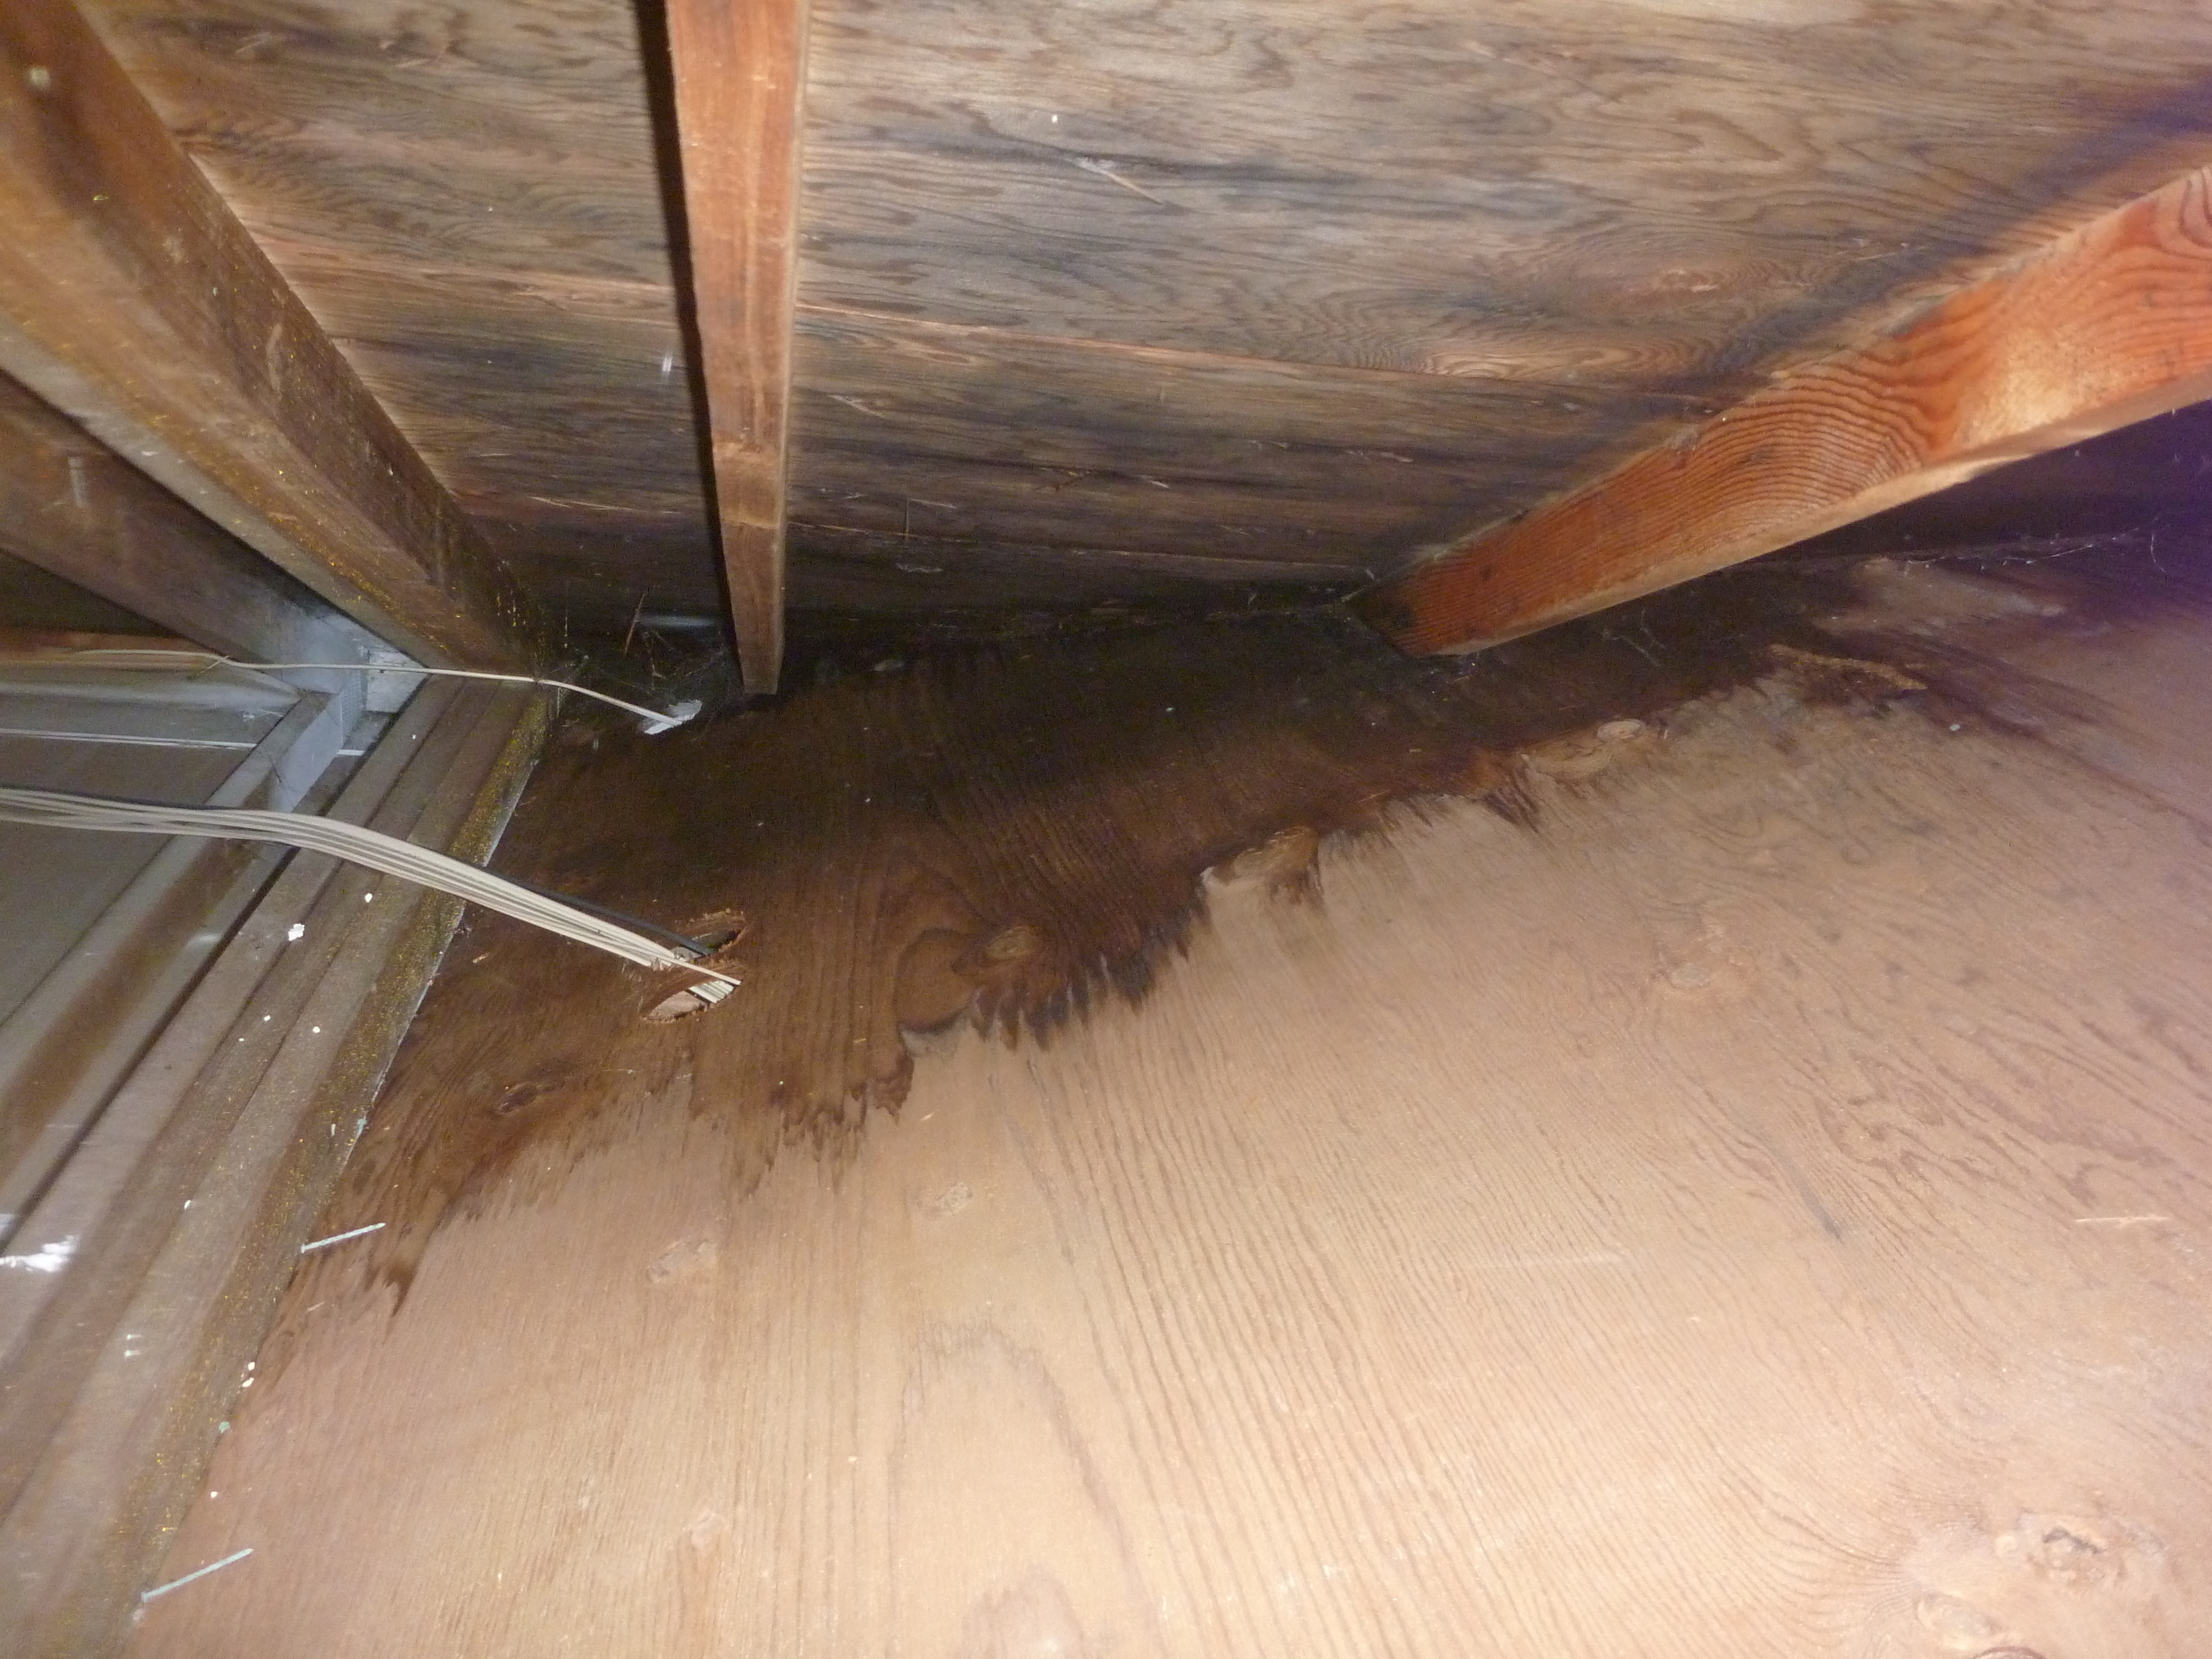
When I got to her home, she showed me the areas of concern. I crawled up into her attic and there was little doubt as to the source of the leakage.
The valleys were soaking wet.

Roofing like other construction trades is pretty straightforward but certain techniques must always be adhered to. The installation guidelines must be strictly followed.
Something as simple as an additional bevel cut into the end of a shingle can be the difference between proper installation and leakage.
There are many different ways to do a proper valley installation. Each style has its own particular guidelines.
This particular home had a “Closed cut valley.”
-1. The first part of this installation is the lining of the valley with an additional layer of building paper or metal liner. This layer
serves to be a ‘last line of defense if all of the other layers of
protection fail.
-This step was likely neglected in this particular
roof.

-2. The next step is that one entire roof slope (the smaller section of the roof or lower slope) of shingles should be installed completely and extended past the center line by at least 12 inches.
-It is difficult to determine if this guideline was followed.
-3. The next step is to roof the other adjoining roof slope. Along with this step, the top edge of the shingles must be cut back and beveled to prevent water infiltration. The acute angle that is at the tips of these extended shingles may
act as a scoop and funnel if they are not provided with an additional
cut to bevel this edge.
-This step was neglected on this roof.
-4. When all of the shingles that are close to the valley are fastened to the roof it is important to hold the
fasteners away from the center line of the valley at least six inches.
-This step was also not adhered to precisely.
The bad news is that my client has some work ahead of her. She is not quite ready to sell, and the rest of her roof has at least 5 more good years of service. It is not a great financial decision to properly repair the valleys since the rest of her roof will need replacement shortly. So, what kind of patching options are there?
Since the valleys are the issue, it is possible to seal the leaks with a generous coat of tar. However, most tar (flexible asphalt-based sealers) are recommended to be installed when the surface is dry. With a little research, I found this stuff:
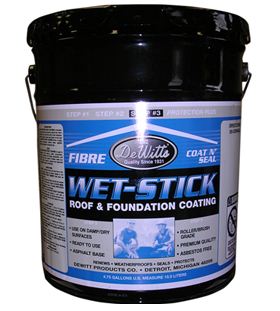 http://www.dewittproducts.com/catalog.asp?prodid=627618&showprevnext=1
This product claims that it is specially formulated to be installed on wet surfaces! Sounds pretty good to me!
Just remember that the tar is a TEMPORARY SEAL!!! This is an important point and as long as a good layer is reapplied in the summer my client should be leak-free until she is ready to replace the entire roof.
Powered by ScribeFire.
