One thing that comes up often during home inspections is foundation cracks.
Most people have heard about someone who had a terrible foundation crack that cost them thousands! Unfortunately, these stories can be true but let’s unpack the term foundation and take a better look at those dreaded cracks.
The term foundation refers to the structure that transfers the weight/load of the house to the soil.
The most conventional modern foundation in Salem, Oregon is a poured concrete continuous perimeter foundation. This type of foundation is made with poured concrete (obviously) and will have a crawlspace most of the time but can have a basement. We don’t see to many basements in this part of Oregon due to the lack of frost. In colder climates the depth of the footing must be below the frost depth or how deep the ground freezes, to prevent heaving. That is why you see basements in cold climate areas. This perimeter foundation can also be made with concrete/masonry block (this was popular in the 1960’s in the Salem area).
Foundations can also be slabs. The entire footprint of the house is a concrete slab with a thicker section around the perimeter to act as a footing. We don’t see very many slab foundations in the Salem, Oregon area. Continuous perimeter foundations are more common because they are less expensive (they use less concrete than a slab) and a crawlspace is a great area to run pipes and wires after the house is built.
On very old houses, 100 years+, we can still see post and beam houses. Some real estate pros will state that because the house does not have a “continuous perimeter” foundation that these houses don’t have a foundation. This is not true as the definition of foundation is the transfer of weight to the soil. Although unconventional by today’s standards these houses are still transferring the weight/load of the house to the soil. These posts and beams can be huge timbers 16″x16″x30′. They typically have issues with wood destroying insects but that is more about moisture management issues than anything else.
Now that we have a pretty good idea about foundations and what they are let’s look at the cracks that can occur in continuous perimeter foundations.
The most common types of cracks are small (less than 1/4″ and mostly vertical). This type of cracks indicates shrinkage. Concrete cures or hardens as a chemical reaction and I have heard people say that it hardens for 100 years! As it is hardening it is also shrinking. As it shrinks is needs to take up less space and it cracks. These cracks do not affect the ability of the concrete to transfer load to the soil and are very normal.

Now we can start looking at cracks that are of concern. In general, any crack that is bigger than 1/4″ should be further investigated, but the shapes of cracks can also indicate the type of movement.
Diagonal cracks. Diagonal cracks are an indicator of movement. Typically, there is a soil/water issue that is affecting the ability of the soil to carry the weight of the house.

“V” shaped cracks are also movement indicators.

Horizontal cracks are another type of crack to watch for.


That covers the most common types of cracks that we see during inspections. As always, if you have any questions about a crack in your life feel free to shoot me a call or email!

 These tubes are
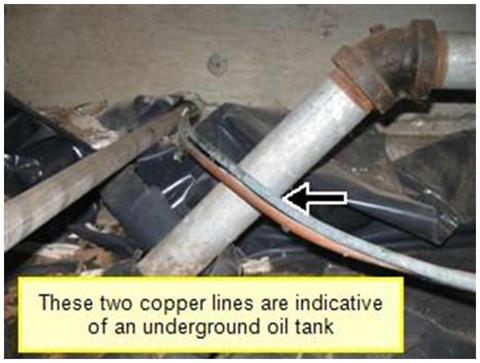


 lls.
lls.


