Roofing

Flat Roof Deck failure and the Story of Repeated Deck Replacements

The coolness factor of a deck/patio that you can walk out onto and having living space underneath cannot be denied.  When houses are built on/in hills it can be a very efficient way to maximize the usable space while minimizing concrete.

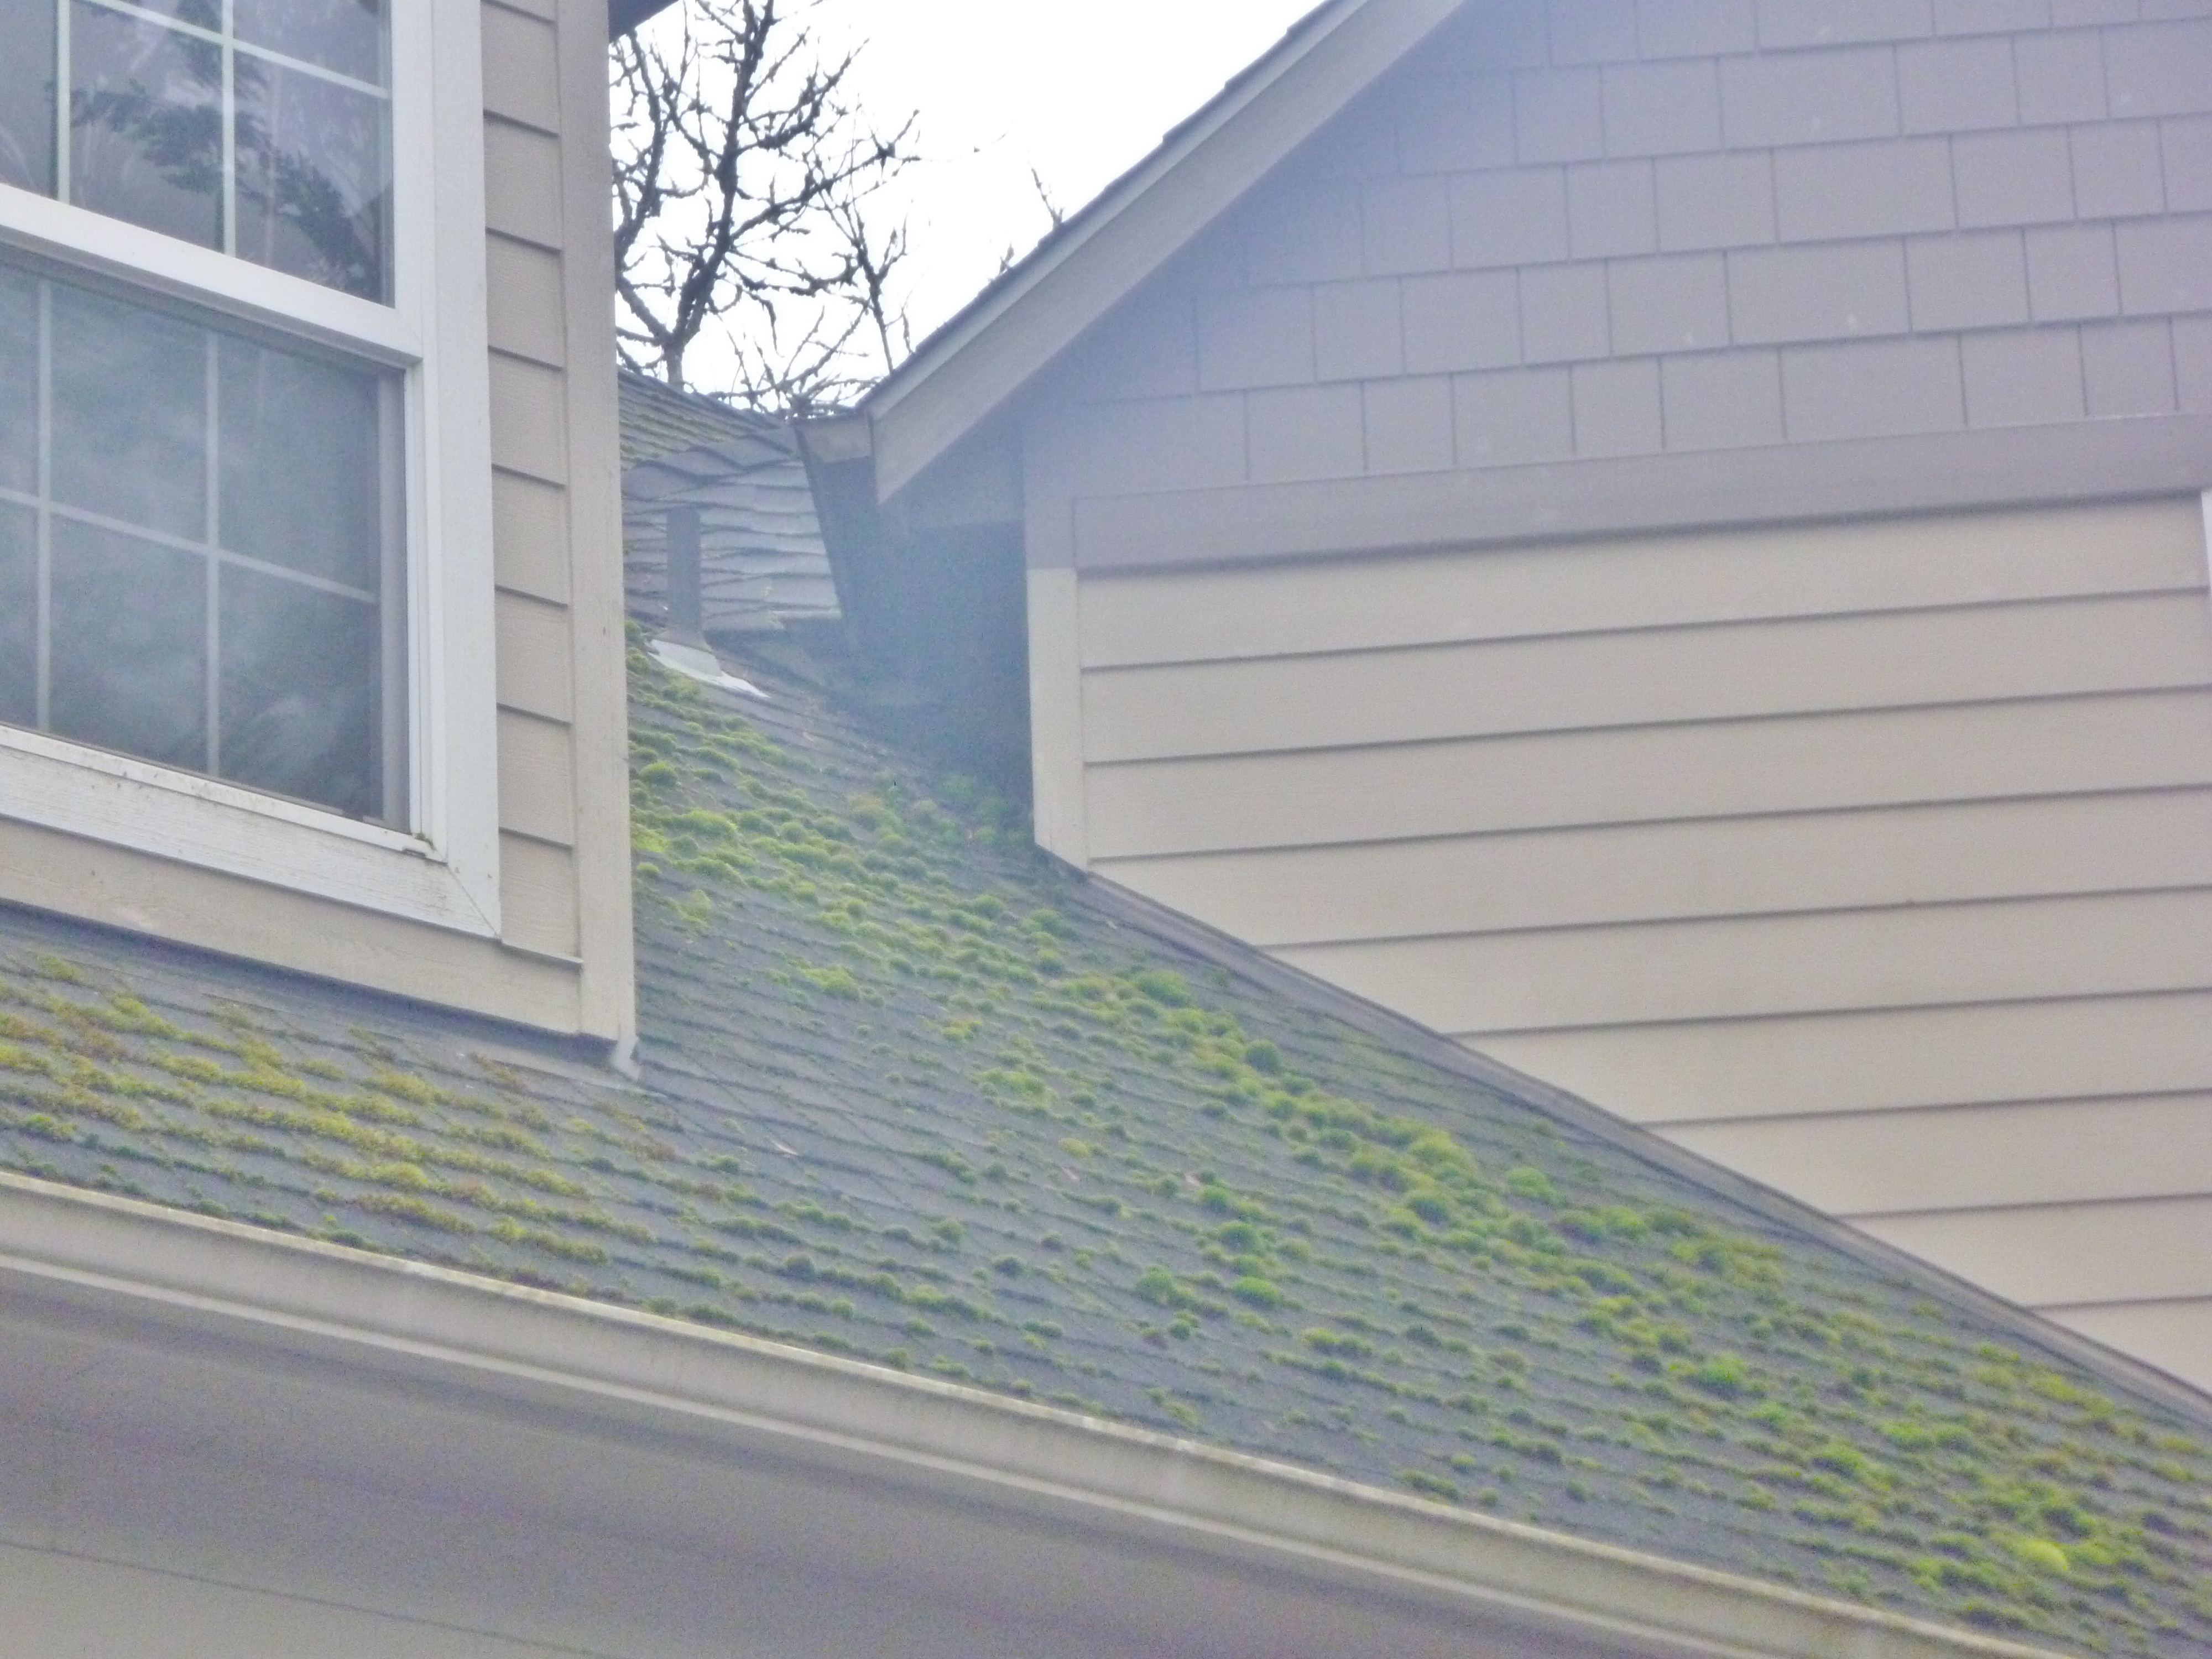
These deck/patio areas are considered “flat roofs.” Everyone hears the word “level” when I say flat and that is not true.  Flat roofs are any roof with a less than 4-12 pitch.  They all have slope, some more than others.  The tricky thing about flat roofs is that they don’t really get to take advantage of gravity to bring the moisture down and away.  The water is flowing down the slope of the surface just much slower and if there are any low areas of areas of ponding water will sit and work on any vulnerable areas until there is a leak.  

Case in point:

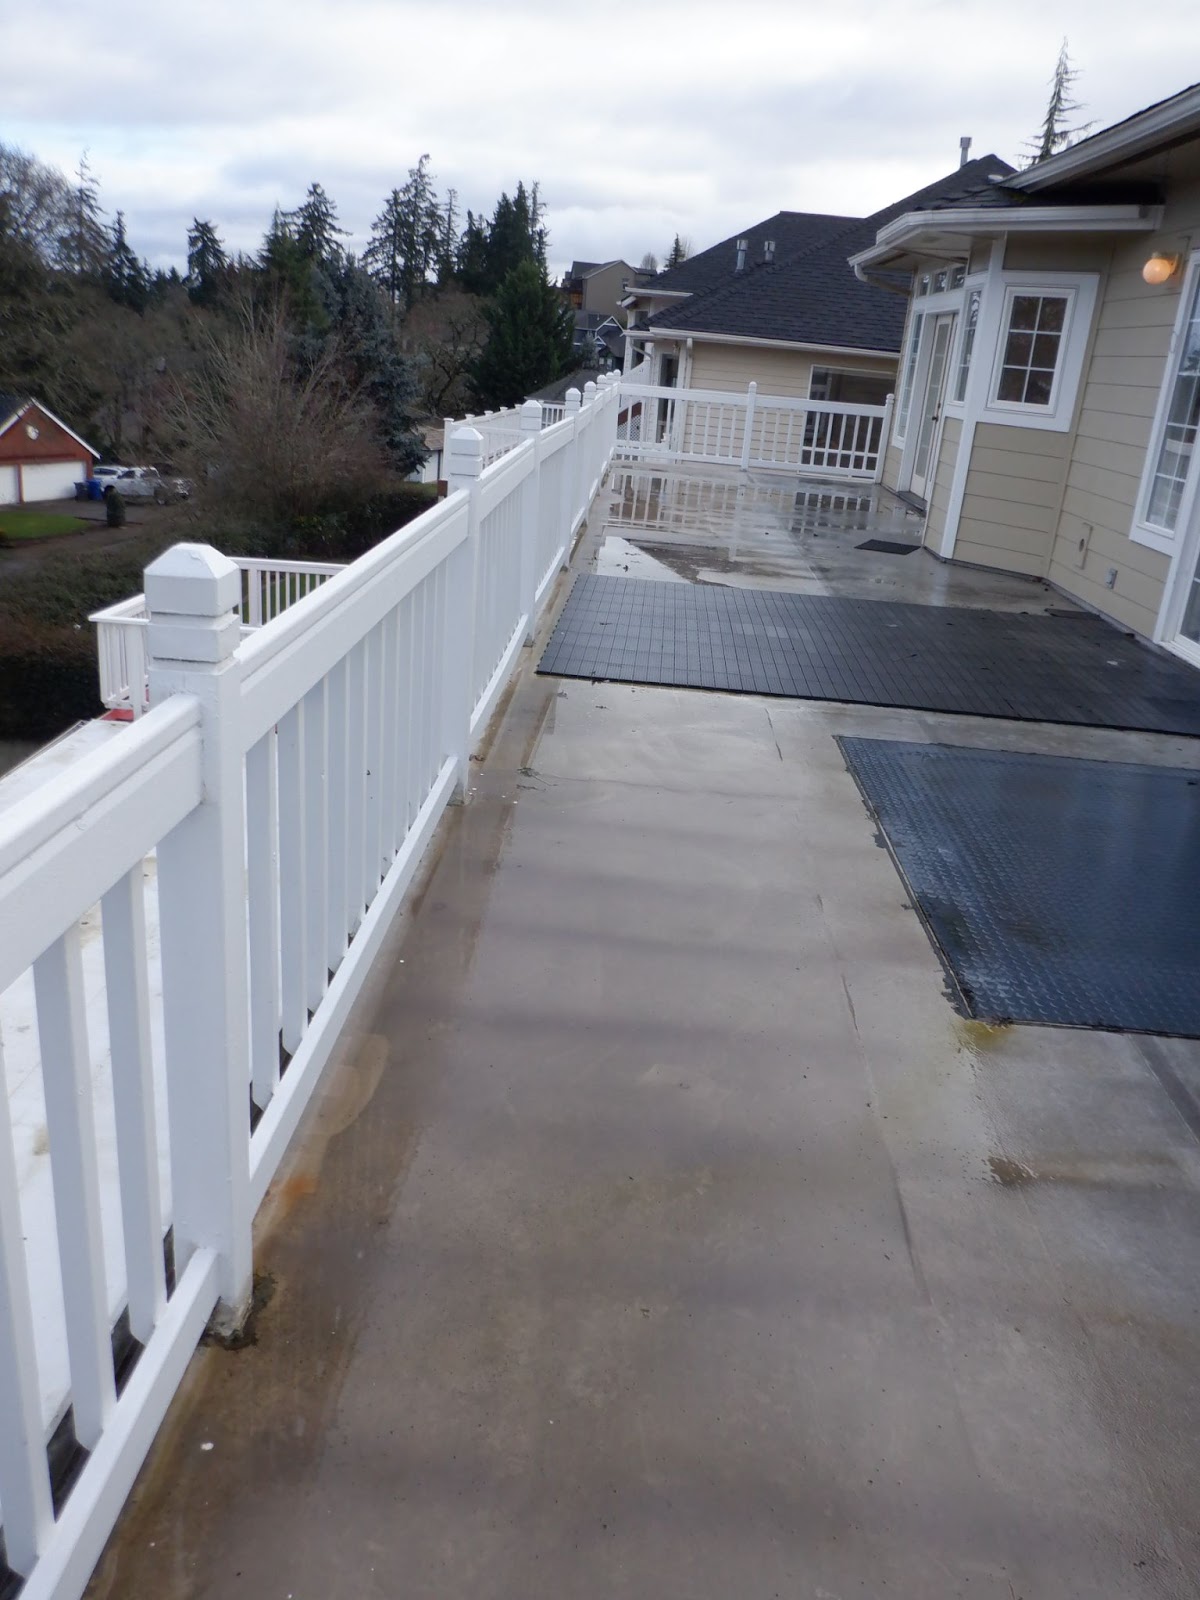
With this decking system we can look into the past a little and see that as the contractors installed the framing and sheathing everything was nice and sloped and smooth.  Then the roofing was installed and part of the roofing at the lowest edge a 90° edge metal was installed.  This created a little high area, right alond the edge that wouldn’t let water drain effectively but over all it was sloped and the standing water could be managed.  Almost done right?  Oh, wait!  We still need a railing!

If the rail has not been thought about until this point in the deck’s construction it is screwed (in more ways than one!).  There is no good way to install deck posts that won’t damage or hamper another part of the roof surface.  With the deck surface needing a rail and a nice (mostly flat) roof surface to the edge the contractor chose to go right through the surface of the roof with fasteners.  This is a terrible installation for structural stability (toe-nailed fasteners are not very reliable against lateral/horizontal forces).

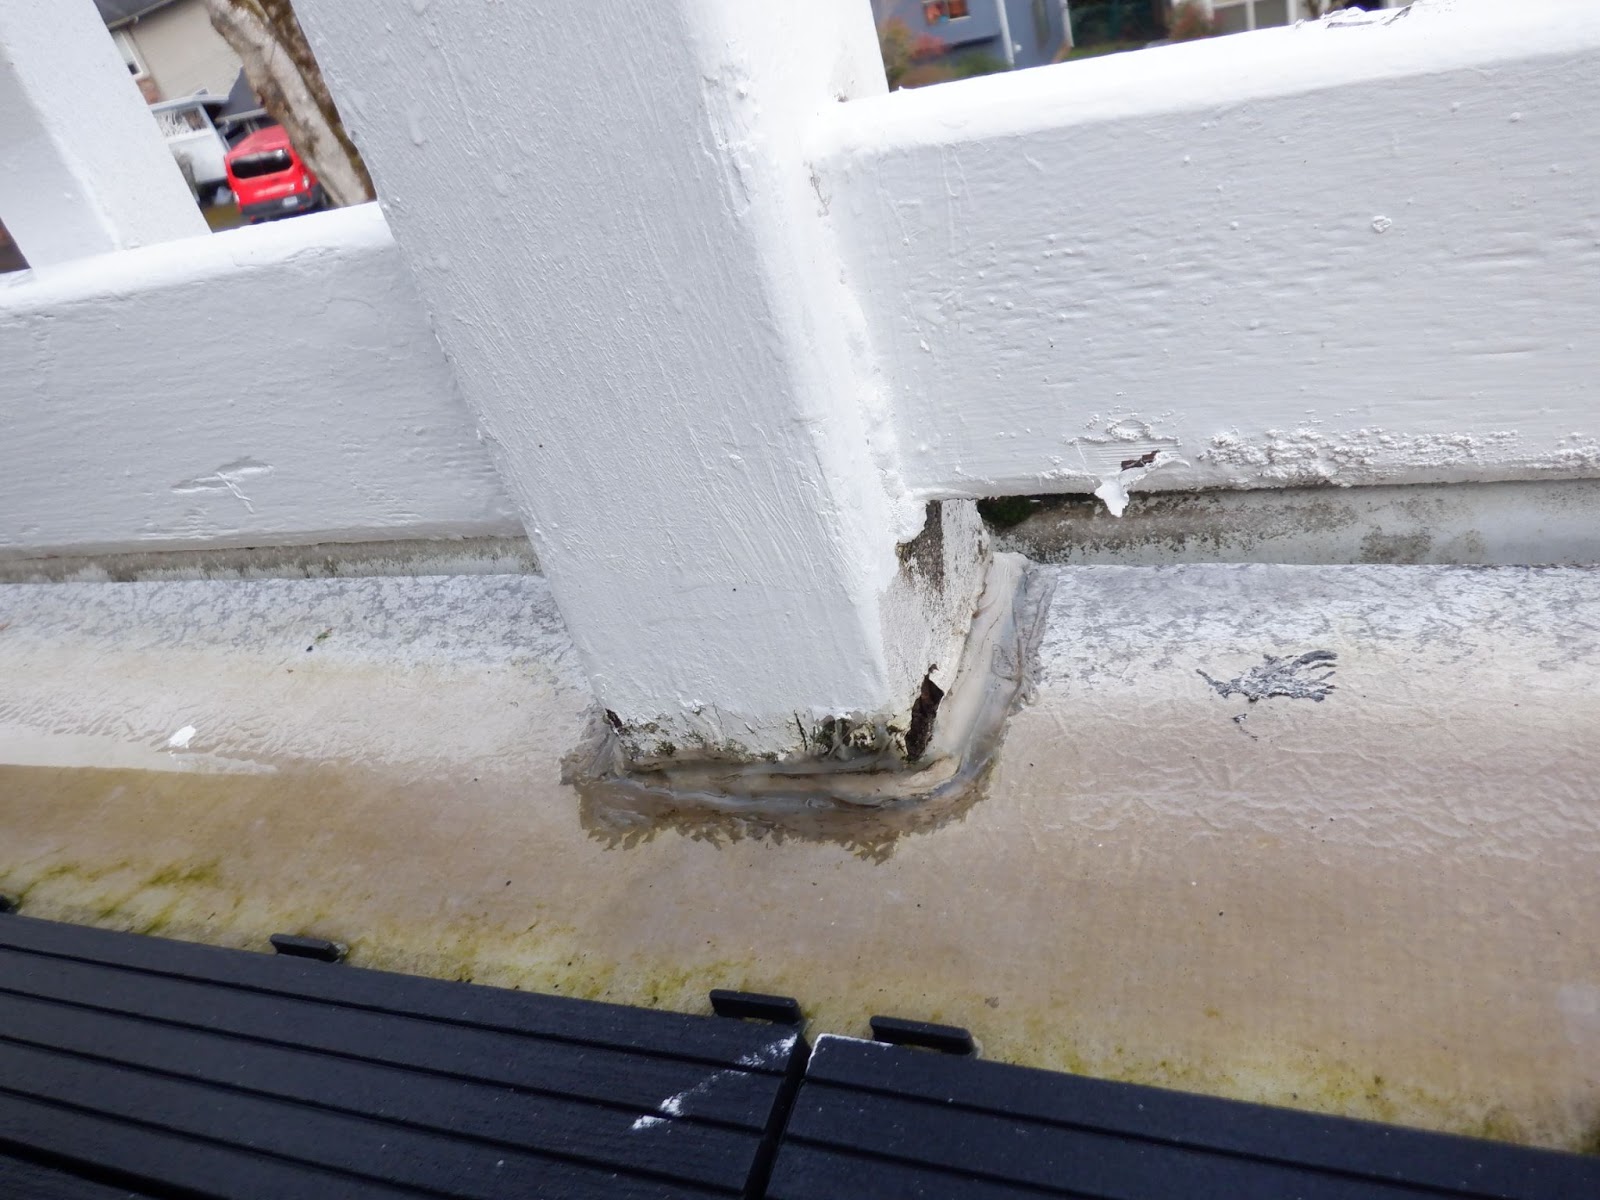
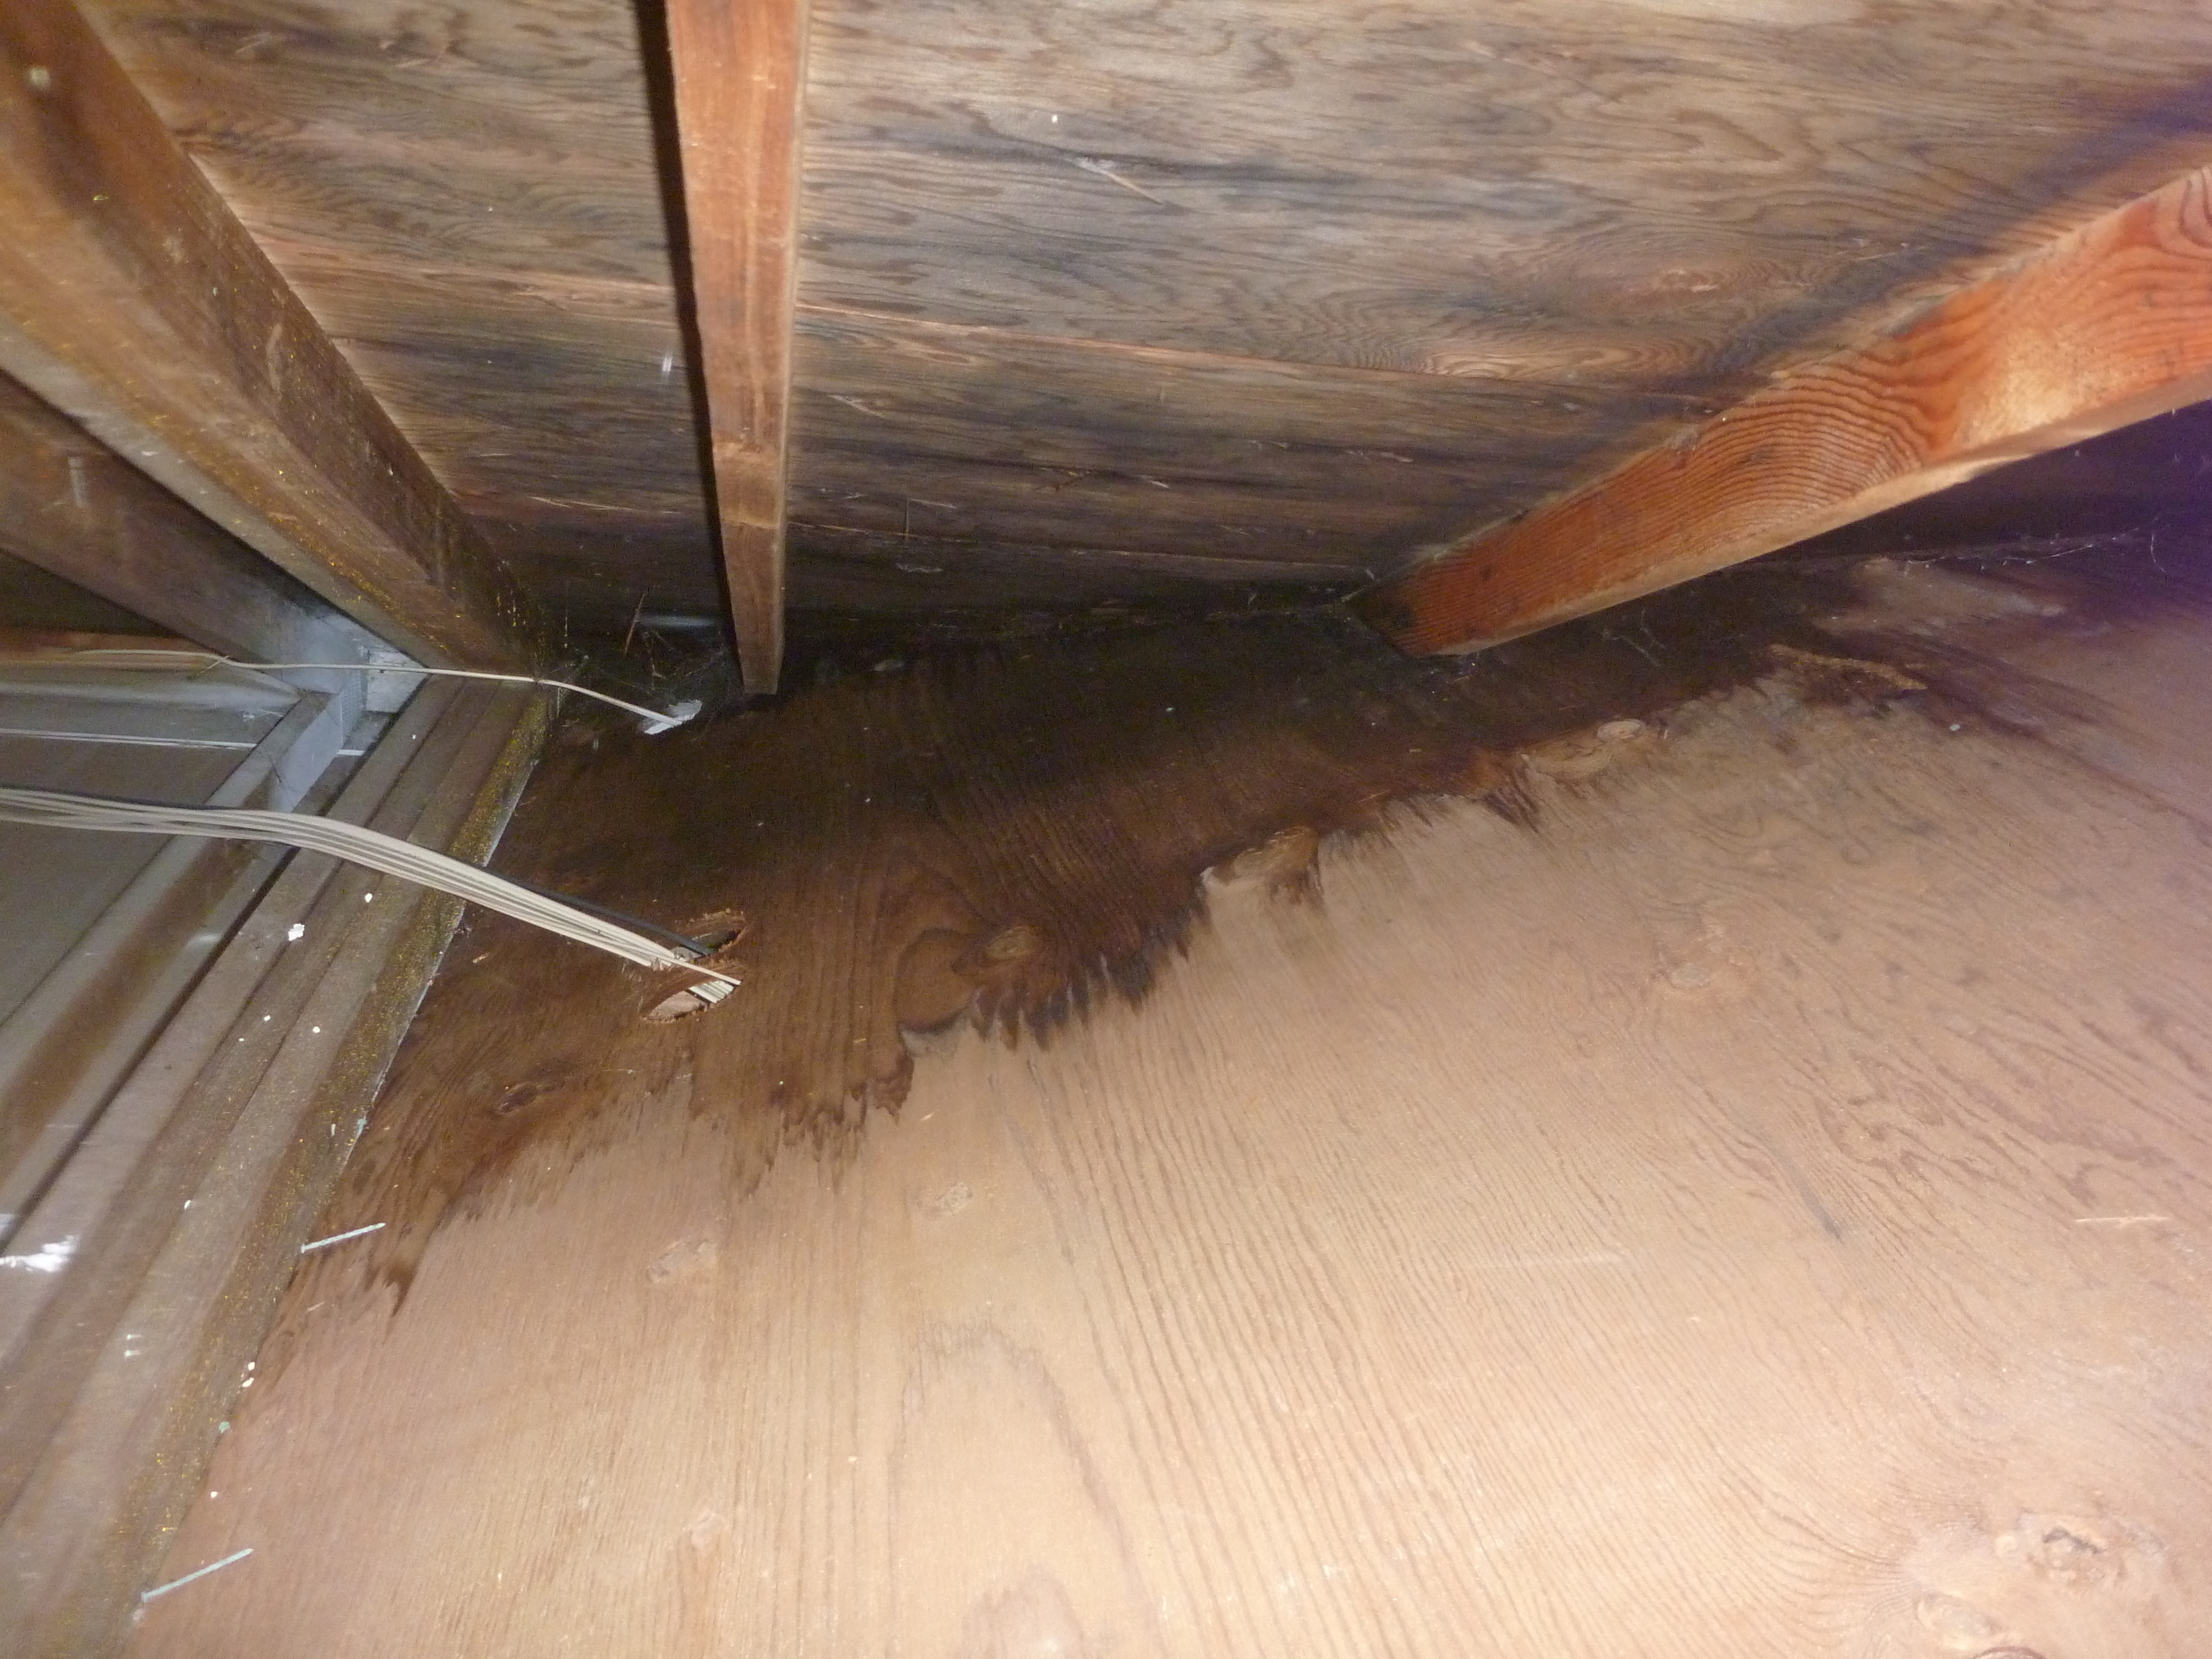
Now, right at the edge of the roof slope, where remember we had those areas of ponding, the roofing membrane was filled full of holes to mount the wooden posts.  The poor home owners tried to caulk this post-to-roofing transition, but it was too late.  

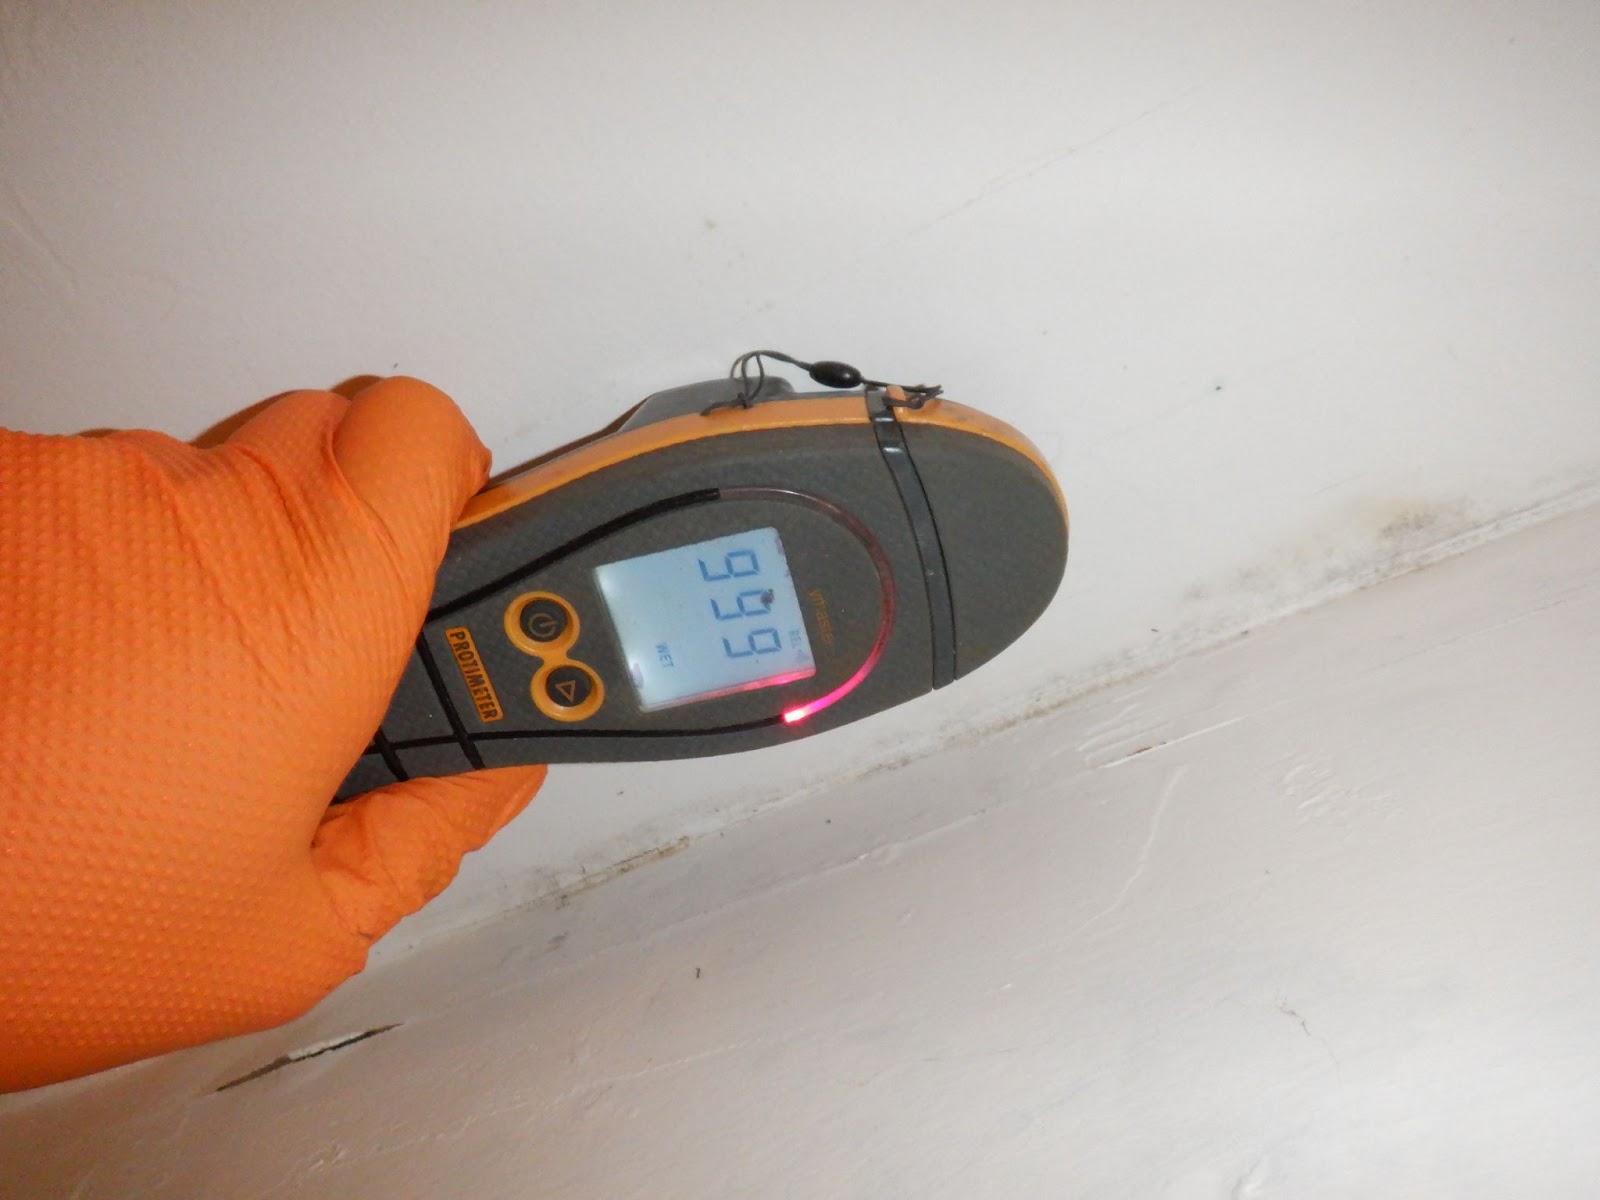
Inside the thermal camera did not see any smoking guns (sometimes it can be hard when temperature inside and outside is very close to the same), the moisture meter was able to confirm current ongoing leakage in this system under the edges and especially where the rail posts where installed.

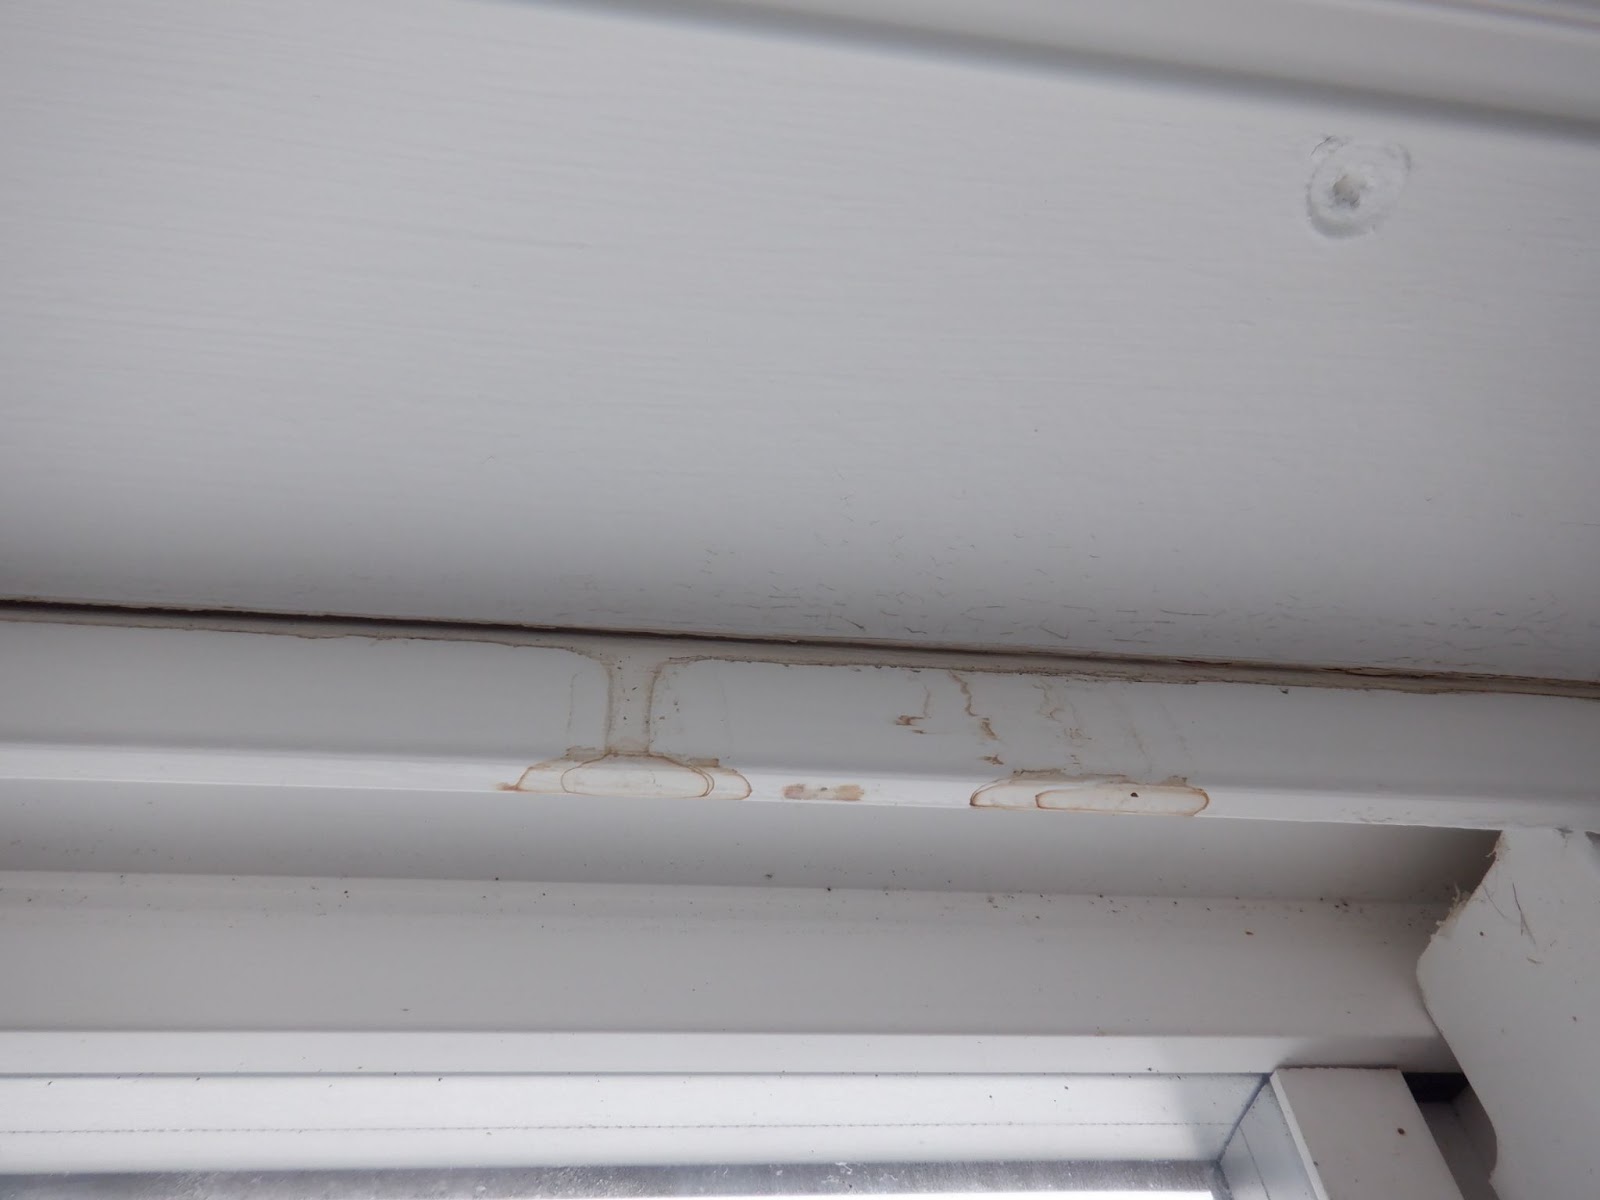
The top sides of the windows are always a good place to check for leakage.  Even if it is not active the tannins in the water from soaking through wood framing alow you to see the “tea” colored stains.

By failing to plan for the finishes and rail this deck was doomed to fail.  These decks can be done much better, but it takes an experienced contractor who knows what the issues are going to be 5 steps ahead!

As always if you have any questions or would like some help diagnosing an issue just give me a call or email:

Jim Allhiser 503.508.4321

Jallhiser@PerfectionInspetionInc.com

Your favorite Salem Home Inspector.

The Return of the Rains

The return of the winter rains have occurred in Salem, Oregon.    Although our wonderful indian summer was enjoyable, it prolonged my inability to find leaks effectively.

Now that a sufficient soaking rain has occurred I can once again find leaks that are not readily visible.

Check out this skylight I inspected recently:

Visual inspection of a leaking skylight on a Salem Oregon Home inspection

Looks good right?


The visible surface of the drywall appeared to be just fine with no stains or bubbles or any tell tale signs of problems.  Thank goodness I have a highly advanced thermal camera:

Thermal image showing skylight roof leakage on a Salem Oregon home Inspection

Those blue areas are current moisture


I am sad to see the sunshine go away but my effectiveness as a home inspector just went up a few notches!

Multi-Layer Roofs

Multi- Layer roofs are roofs that have had an additional layer of roofing added over the top of a layer that has reached the end of its useful life.

Multi-layer roofs are the goto solution for house “flippers” and people that need a new roof surface but would like to do it as inexpensively as possible.

Salem, Oregon home inspection showing a multi layer roof

The edge of the roof is the best location to determine if you have a multi-layer roof.

There are some benefits and some problems with this situation:
The main upside to going over the top of an existing layer of shingles is cost. The labor that it takes to remove the old roof and the dump costs can be directly subtracted from the cost of the new roof. In general this savings equals around 10 to 20 percent of the cost of the new roof. If you are planing to move in the near future this saving may seem like a good deal.

Now lets look at the downsides. Wear and tear: Multi layer roofs are usually not warranted by the shingle manufactures and they will not last as long. How much shorter the new shingle’s life will be depends on many variables but two thirds to three quarters the life is a safe bet. Also multi-layer roofs will have more issues with nail pops, or fasteners that poke through the surface of the new shingles. This condition is due to the fasteners not being long enough to penetrate through the old shingles and in to the wood sheathing properly.

As a local Salem, Oregon home inspector I see these type roofs often and it is important my client understands what a multi-layer roof actually means. Most shingles are at least 20 year products (if they are installed correctly!) so even on a multi-layer roof you should have at least 12-15 years of relatively trouble free roofing.

Seller’s inspections are good for everyone!

Buyer: “I do not want that home.”

Listing agent: “….but the defect in the roof is relatively minor, and can be fixed for a few hundred dollars.”

Buyer: “If the contractors did this wrong who knows where else they cut corners!”
fungus growing on roof sheathing on this new home Missing building paper on this home's roof in Dallas Oregon.  Noted on a home inspection.
This situation happens more often than you would think. A good home inspector is paid to enter a home and tell the client about how the home works and how the house compares to a perfect house. Home inspectors that have been in the business for some time rely heavily on professionals in the real estate field who refer us. Finding relatively small material defects that cause our clients to want to scrap the deal happens more often than most of us would prefer. Our client’s risk tolerance is not up for us to decide and a relatively minor defect in one person’s eyes can be looming shadow over the entire rest of the house in another’s.

To combat the dreaded “surprise defects,” seller’s inspections have become more and more popular. In my opinion these inspections are one of the best things that can be done by a seller to prepare their home to sell.

There is no such thing as a “perfect” home. This is one the first things that I tell a client, whether they’re buying or selling a home. The purpose of a good home inspection is to be a consultation. As a comparison I use a “perfect home,” as a fictitious example of the ways and a home could be better.

Every home has issues and as a part of preparing your home to sell, it should be in the best possible condition. Repair issues that can be easily taken care of, by a seller, can and do scare away buyers. This can only be prevented by discovering defects early. This early discovery allows you to take care of the issue on your terms.

Having your home inspected first can also attract buyers. If a buyer knows that there are no big issues with a home they will be more comfortable. Another benifit to consider……
Buyer’s agents may be more likely to show your home if they know that it will not be a waste of time.

Seller inspections are good for everyone involved in the transaction

I have Moss all over my Roof! Now what?

Moss is very common in this area. Moss and algae grow mostly in areas of low light and high moisture. Low light and high moisture pretty well describes most of the western northwest and the wintertime.  Some of the most common ways to treat and maintain your roof are listed below.

One of the areas that moss is a concern on homes in this area our roofs. Depending on the roof’s exposure moss can grow most of the year.  If sections of your home’s roof are shaded throughout the day and stay moist these are likely areas to grow moss.

Over time moss can damage your shingles if left un-checked. As the moss develops into a larger and larger colony more and more moisture is held against your roof. The colonies will also develop root-like systems that will dig into the surface fibers on your shingles. As the colonies grow larger, they can actually lift the edges of the shingles and delaminate the surface granules.

There are lots of ways to kill moss. Most of the good techniques involve some sort of the heavy metal application usually copper or zinc. Some really bad ideas involve laundry detergent and or power washers…

In general, the more trees you have around your house and/or the steeper your roof the more applications of moss killer you’ll need.

1.  The best way to control moss is with an annual or biannual application of a powdered or liquid name brand moss killer designed for roofs. For steep roofs I have found the liquid anti-moss chemicals and a hose end attached shrub and tree sprayer to be a handy tool.

Moss out for roofs
Moss killing powder

2. Another option for continuous moss control are some new shingles that are actually impregnated with copper granules. I have only seen the shingles used on several roofs and the major issue with these is the fact that the ridge shingles did not appear to be impregnated and still need to be treated for moss/algae growth.

https://www.certainteed.com/residential-roofing/certainteeds-streakfighter-algae-resistant-technology/

3. Mechanically removing the moss is also an option. This option is really only for the very worst conditions. It involves a paint scraper, screwdriver, putty knife or something similar and trekking across your roof slope and very carefully removing the moss growth. This technique is very prone to damage of the asphalt composition shingles and should be used as a last resort.

Moss on a Salem, Oregon home

4. Zinc or Copper Strips- These may be ok for preventing algae growth but moss looks at the little strips and laughs. You may have noticed some homes around town that have clear/clean sections of shingles under the metal roof vents. What is going on here is the zinc from the galvanized steel roof vents is leaching onto the roof surface and running down every time it rains. This has lead people to believe that sections of copper wire or small strips of zinc could be an effective way to kill moss. In the wet PNW this is not an effective technique. The difference is all about surface-area. The galvanized roof vents have a good amount of metal exposed and therefore a pretty good amount of zinc washes down the roof surface. Compare that surface to the 2″ wide strip of zinc and you can see there will be far less leaching occurring off the little zinc strips. The strips usually are effective for 2 to 3 feet down the slope. I have seen the strips added every 2 feet down an entire roof slope. This installation appeared to be effective, but it was weird looking and I have only seen that once on the top of a three-story apartment building.

5.  Power washing, scraping with brooms, or laundry detergent. Unfortunately, I see the aftermath of these steps to control roof moss on far too many Salem area home inspections. If you are reading this post you probably have educated yourself enough to know that blasting or scraping the surface off of your asphalt composite roof is a bad idea.

-There may be some contractors who use power washers to clean roofs, but these individuals are licensed, bonded (and most importantly insured) and have the experience to know which nozzle to use and how far to hold it away from the roof surface. Even with this experience and expertise roof life is blasted away. It is probably the last 5-10 year of roof life, so you may not see issues for a while. Power washing should be strictly limited to the driveway and walkways surfaces around your home.

-Brooms and other mechanical abrasives are also techniques that should either be left on the ground or for qualified professional contractors. The removal of the surface granules on the asphalt shingle removes the ultraviolet resistance of the shingles and will cause premature failure of the system.

-Laundry detergent, although will kill moss on your roof, is full of degreasers. An asphalt based composite shingle is a petroleum-based grease compound. Do not put degreasers on your greasy roof(Thanks Joe Ocilia for educating me on this fact!)

Those are my 2¢ on how to control moss. Being a Salem, Oregon home inspector, I get the chance to see various maintenance techniques. By far the best one to use is the first one, which is a chemical, powdered or liquid, commercially available moss killer applied at annually or biannually.

Leaks in the Roof tracked back to Problems with Original Installation and some Ideas for a quick and dirty Tar Seal

The other day I helped a client with an unfortunate situation: her home’s roof was leaking.


The worst part of this issue was the fact that she had paid roofers to find and repair this leak multiple times.

This last summer she even had the drywall repaired under the leak figuring that the roofers had actually done what they had been paid to
do.

By the time she got a hold of me, she had reached the end of her
rope and was on the edge of tears. I told her that I would be happy to
come to do an inspection to locate the leak and hopefully give her some unbiased answers.


When I got to her home, she showed me the areas of concern. I crawled up into her attic and there was little doubt as to the source of the leakage.
The valleys were soaking wet.


Roofing like other construction trades is pretty straightforward but certain techniques must always be adhered to. The installation guidelines must be strictly followed.
Something as simple as an additional bevel cut into the end of a shingle can be the difference between proper installation and leakage.

There are many different ways to do a proper valley installation. Each style has its own particular guidelines.

This particular home had a “Closed cut valley.”

-1. The first part of this installation is the lining of the valley with an additional layer of building paper or metal liner. This layer
serves to be a ‘last line of defense if all of the other layers of
protection fail.

-This step was likely neglected in this particular
roof.


-2. The next step is that one entire roof slope (the smaller section of the roof or lower slope) of shingles should be installed completely and extended past the center line by at least 12 inches.

-It is difficult to determine if this guideline was followed.


-3. The next step is to roof the other adjoining roof slope.  Along with this step, the top edge of the shingles must be cut back and beveled to prevent water infiltration. The acute angle that is at the tips of these extended shingles may
act as a scoop and funnel if they are not provided with an additional
cut to bevel this edge.

-This step was neglected on this roof.

-4. When all of the shingles that are close to the valley are fastened to the roof it is important to hold the
fasteners away from the center line of the valley at least six inches.

-This step was also not adhered to precisely.

The bad news is that my client has some work ahead of her.  She is not quite ready to sell, and the rest of her roof has at least 5 more good years of service.  It is not a great financial decision to properly repair the valleys since the rest of her roof will need replacement shortly. So, what kind of patching options are there?

Since the valleys are the issue, it is possible to seal the leaks with a generous coat of tar.  However, most tar (flexible asphalt-based sealers) are recommended to be installed when the surface is dry.  With a little research, I found this stuff:

http://www.dewittproducts.com/catalog.asp?prodid=627618&showprevnext=1

This product claims that it is specially formulated to be installed on wet surfaces! Sounds pretty good to me!

Just remember that the tar is a TEMPORARY SEAL!!! This is an important point and as long as a good layer is reapplied in the summer my client should be leak-free until she is ready to replace the entire roof.

Powered by ScribeFire.

Don’t make Griping about Gutters so easy on this Marion County Home Inspector

Debris Noted on a Roof Inspection on this North East Salem Oregon GutterYour gutters need attention.  The shorter days have told the trees to drop their leaves.  Not only that, the rains are about to begin again. Your gutters will be working overtime for the next few months in this area.  It is important to keep your gutters clean.  This will require cleaning your gutters out several times over the next few months as the different trees around your home drop their leaves at different times.

We all know that the parts that are exposed to the elements (and leaves) are important to keep clean but lets not forget about the underground pipes as well. These pipes are low and out of sight and are easy to forget about. Those underground pipes are probably the most important part of the system as they will collect, concentrate, and (hopefully) remove the concentrated storm water from around your house.a home inspection of a downspout revealed leakage on this Illahe home inspection

In Marion and the surrounding counties, the underground pipes are usually where things are going wrong and unless inspections or unusually close attention is paid, things can go wrong for months or even years.   It really is all about the way we receive rain.

The rains in the Willamette valley, in Salem and surrounding parts of Oregon show up in mid October and things stay moist until the middle of May.  We don’t necessarily receive a lot of rain, it is just steady and the clouds do not usually part long enough to dry anything out.

The gutters, downspouts and underground pipes are the wettest points around our home.  If there is water in your crawl space or basement the gutter and downspout system is usually the main culprit.  Standing water in the crawlspace of this South Salem Home

A great test for the underground system is to shove a garden hose in it and see where the water comes out.  If water bubbles to the surface in the area you are testing…….you have some work to do.

How old is your roof? This Salem Oregon Inspection has a trick!

My favorite part of being a home inspector here in Salem, Oregon is learning CONSTANTLY! For an attentive observer, there are always things to learn about.

A few years ago, I was on a roof and the agent asked me how old the roof was. I told her that I couldn’t really tell, but that I guessed that it was maybe 1 or 2 years old. She asked me why didn’t I look at the date stamp on the flashing boot?

(•blank-home-inspector-look•) The wha…!?

Yup, every so often even the know-it-all home inspector has something to learn. Right there, stamped for all who know where to look, is the date that the flashing was made. Of course, this is not an exact date of roof installation, but it is usually within 6 months.

A pretty neat little trick.

That is NOT how to clean moss of your roof!

First time home buyers are fantastic.  Never before have you had to do any kind of maintenance on the place that you were living.  If there was a problem you just called the landlord.

Now, you are going to be in charge of an ENTIRE house!!  It can be intimidating, especially after a good home inspection!  Not to fear you first timers, there have been lots of people in your shoes and many with even less technical understanding of the maintenance issues that plague your new home.

In the Salem, Oregon area one very common issue that will require attention is moss growth on your roof.  To be fair, this is not a life and death issue, however with less than a few hours of attention a year this issue can be effectively controlled.

Moss tends to grow in the shady sides of the home.  Mostly this has to do with the 8 months or so that your roof will stay wet in these areas.  This constant moisture creates an ideal location for algae population.  If moss is allowed to flourish unchecked it can create little pockets that catch and hold moisture.  Also the moss can actually begin to lift the shingles.  All of this catching and lifting will slow the water that is running down the slope and the longer water is on your roof the shorter the life of your roof will be.

Ok, we know that moss is not good but how do we control it?  Moss killer.

Moss does not like reactive metals like zinc and copper.  Commercial available moss killers like, “MossOut or any of the other sprays or powders are best.

  • The moss control measures that do not work or maybe work too well, at the expense of the life of your roof are: Strips of zinc that claim to leach onto the roof and kill moss continually.  These strips are good only in theory and only tend to protect about two feet of the down hill roof surface.
  • Also, moss will die if treated with laundry detergents, however laundry soaps have surfactants (read: de-greasers).  Composite shingles are made of asphalt (read: grease!).  These detergents can quickly chew holes in your roof!!
  • Power washers.  Please, please DO NOT power wash your composite shingle roof.  The idea behind killing moss is to prolong the life of your roof.  You will quickly shorten the life of the roof you are trying to prolong by blowing it to smithereens with a well meaning power washer.